Sunday, October 24, 2010

Samhain, Returns, Bananas

Well, I haven't posted in a year and twelve days, and since "a year and a day is the pagan way," I figure I should get back into posting here, since I miss it. Long story short, last year was Hell Semester, parts II and III (this semester might be part IV, but fuck it). On top of that, my mother passed away in January, and a good friend of mine took her own life at the end of August, so life was just pretty terrible in general. Needless to say, I did a lot of comfort eating.
On the lighter side of things, I discovered that, despite the insanely unhealthy things I was comfort-eating, I am probably the only person in the world who will lose weight when he subsists on junk food and antipasti. Thankfully, I've gained back much of my prodigal poundage, so I'm fractionally less twiggy than I was when I came back to school. All this food talk brings us to...

Samhaintide Banana Bread
(version 1)

Banana Bread!

So, it turns out that the pantry in my apartment is a really good place to (over)ripen fruit. The bananas that were perfect on Friday were quite beyond ripe this afternoon. Solution? Make spiced banana bread! This was my first attempt at writing my own cake recipe, so it still needs tweaking here and there, but preliminary results are delicious!

4 bananas, mashed
1 stick butter
¾ cup white sugar
¼ cup tightly packed brown sugar
1 tsp cinnamon
¼ tsp nutmeg
¼ tsp ground cloves
1 Tbsp 1 tsp bourbon
2 eggs
2 cups flour
2½ tsp baking powder
Pinch of salt

  1. Preheat the oven to 350˚F
  2. Beat together the banana pulp, brown sugar, cinnamon, nutmeg, cloves, bourbon, and eggs
  3. In a saucepan, melt the butter over low heat. As it melts, whisk in the white sugar until it is quite smooth
  4. Let the butter/sugar mixture cool a little, then beat it into the banana mix
  5. Blend in the flour, salt, and baking powder
  6. Pour into a 9x9 cake pan and bake for one hour, or until a toothpick stuck in the cake's centre comes out clean
This cake is very dense and spicy and delicious. And best of all, it's healthy for you! (Totally! It's got bananas and everything!) A good use for overripe bananas, especially when the weather calls for this sort of spicy confection. The cake didn't quite rise the way I wanted it to, and it baked a little odd (maybe I should have baked it in glass instead of lovely, non-stick silicone?), so I need to tweak the amount of flour, and maybe add an egg. Also, another tablespoon of bourbon wouldn't go amiss. But, all in all, it is very delicious.
Glad to be back and posting again~ Stay tuned for version 2 of this recipe! Also, coming up in my next post, one of the richest, beefiest stews you'll ever eat. 'Til then, eat well!

Monday, October 12, 2009

Pintos, Chicken, Laziness

Hello, hello! I'm actually posting again! Will this become a regular thing? Hope so!
So, school's been crazy busy (of course), but I've been feeding myself plenty well (yaye!), so I have a few things to post about.


So, Wynona had her first batch of cornbread in the apartment, and it was probably the best batch I've made so far. I don't know what I did differently, but the batter came together much better that it usually does...it was actually a batter instead of meal in liquid. Perhaps it's because I used whole milk? In any case, I devoured it almost instantly. It was rather nice with sour cherry preserves.

So, being a college student, I'm rather lazy. Enter the lazy supper! It takes about half an hour to make, depending on how fast you prep spinach, and really requires very little work apart from that.


Lazy supper consists of spinach, scrambled eggs, bacon, and corn pone. (This corn pone recipe is from Crescent Dragonwagon's Cornbread Gospels.) The first thing you do is start the corn pone. Set the oven to preheat to 375F while you throw 2 cups of corn meal, 1 tsp salt, and 1 tbsp drippings (or butter)into a bowl and pour 2 cups boiling water over them. Give the mix a few good stirs and let it sit 5 to 10 minutes. While it sits, prep your spinach, and scramble your eggs. Check your corn mash. If it's cool enough to handle, form pones about 1/3 inch thick, put them on an oiled baking sheet, and throw them in the oven. Otherwise, fry up your bacon first, making sure it renders up a good amount of grease (oooo, yummy yummy bacon grease!). At this point, the pones should definitely go in the oven, for about 15 minutes. While they bake, saute your spinach until it's just cooked, and plate it with the bacon. Make sure you get all the pot-liquor, too--the pones will soak it up and be super delicious! Now come the eggs. Replenish the pan's fat if you need to. Your eggs should be perfectly cooked as soon as the pones are ready. Plop a couple pones on your plate, add the eggs, pour yourself a nice, cold glass of milk, and dig in!

I haven't been entirely lazy, though. Weekends are my big cooking days, and I've done two big projects that I'm rather proud of. The first is a roast chicken. This method is actually one that Matchstick and I developed last year, and it's totally one of my favourites.
  • Remove the giblets and rinse the chicken inside and out. Pat dry with paper towels. Remove that silly, useless pop-up timer!
  • Place the chicken in a roasting pan, and tuck its wings back. I'm not sure how to explain how to do this, but you kind of twist the tips of the wings around to the wrong side, behind the shoulder blades...if you have questions, better consult Julia Child.
  • Slice an orange, squeeze half of it all over the chicken. Stuff both halves into the cavity.
  • Peel and halve an onion, and stuff that into the cavity too.
  • Sprinkle the chicken with ground cloves, salt, and a little pepper.
  • Roast at 350F until the temperature is 180F on the meat thermometer, or until the drumsticks are loose and wiggly when you jiggle them.
  • Let the chicken rest 10 minutes before carving.
This recipe always comes out moist, even without basting, and I really love the spicy note the cloves add.

One of the benefits of roasting a whole chicken, instead of just thighs (or whatever), is that you can make your own chicken stock! And, since it's getting to be that time of year, when everyone suddenly catches dorm (or homeroom) plague, there's nothing better to have on hand than a nice batch of Yiddish penicillin. Home made chicken stock is so fantastic, and almost guaranteed to cure whatever ails you! So, once you've carved your chicken thoroughly, don't throw away that carcass! Put it in a pot with the wings, and maybe even the leg bones, throw in the giblets, three ribs of celery, one or two scrubbed and broken carrots, some peppercorns, and a dash of salt. Add enough cold water to cover everything and fill the pot. Bring the pot nearly to a boil, skim any scum that formed, and set it to simmer, covered, for...well, for as long as you feel like. Longer is usually better. You want to extract all the chickeny goodness you can. You should skim the pot occasionally. After, o, six hours, taste the stock. You may want to simmer it down a bit if it seems weak, but when you deem it finished, strain your stock into a separate container. You'll probably have enough to freeze a good portion and still have enough for soup. If you're going to make chicken soup straight away, you can pick the meat from the carcass and add it to the soup, along with slices of the carrot you used for the stock.

My second project is the beginnings of a recipe for pinto beans. Inspired by my success with blackbean soup, I decided to be daring, and came up with something rather nice, but definitely in need of some tweaking:
  • 1 lb dried pinto beans, soaked
  • 3 ribs celery, chopped
  • 1 "cheek" cabbage, shredded
  • 1 onion, chopped
  • 3 cloves garlic, smashed
  • 4 strips bacon, chopped into medium chunks
  • 1/2 tsp cumin seed
  • 2 costeño chilis
  • 1 ancho chili
  • 3 chilis de arbol
  • 3/4 tsp cumin
  • 3/4 tsp paprika
  • 1/4 tsp cinnamon
  • 1.5 cups chicken stock
  • Salt to taste
  1. Set the costeños and ancho to soak in a bowl of hot tapwater
  2. Fry the bacon in the bottom of a large pot, stirring it to make sure it renders all its fat
  3. When the bacon is crispy, remove it from the pot, and toss in the cumin seed and garlic. Saute a few minutes
  4. Add the onion, and cook until they begin to turn yellow
  5. Add the celery and cabbage, cooking until the cabbage is well wilted
  6. Remove the costeños and ancho from the water, and squeeze them out. Discard the water and chop the peppers. Add them to the pot
  7. Wash your hands really well. The capsacin from the peppers will cling to your hands, and if it gets in your eye by accident, bad things would ensue
  8. Add the beans, bacon, and chilis de arbol
  9. Add the chicken stock, and enough water to cover everything
  10. Add all the spices except the salt, and stir well
  11. Bring to a boil, and simmer, covered, until the pintos are nice and soft
  12. Stir the beans, and mash a good number of them against the side of the pot as you do
  13. Add salt to taste, and simmer until nice and thick
  14. Serve over rice or macaroni!
I like the way the bacon compliments the meatiness of the pintos, and the sweetness that the ancho chili adds. The cinnamon definitely is a nice addition, but I need to fiddle with the seasonings a bit. I definitely need to up the heat, probably with more chilis de arbol, and maybe a couple other varieties of pepper...maybe pasillas. I might add a pinch of cocoa, too, to balance the sweetness of the peppers with the pungency of the cinnamon.

Well, that's all for now. Next time, snickerdoodles!

Saturday, September 12, 2009

*Cough* *Taptaptap* Is this thing on?

Eheh...So, I've been officially delinquent. But! I'm back at school, and in the North Apartments! So I have a kitchen and am cooking almost all of my meals! That's super exciting.

Matchstick pointed out to me that it's been about nine months since my last post. And that's kind of a gestation-ish length of time, so what better time for Coquus Macer to be born anew! Dude, I'm totally serious about doing this. Seriously.

...or at any rate, I'm going to try hard! がんばりますよ!

So, over the summer, my super fantastic mom got me a nice bunch of new cookware. I've gotten to play around with most of it. One of the most exciting pieces she got for me is my very first cast-iron skillet. I named her Wynona. Wynona is fantastic, and her inaugural recipe was Southern cornbread.

This is a recipe that I've been fond of for some time now, ever since Matchstick bought me The Cornbread Gospels, by Crescent Dragonwagon. It's super-simple, fast, inexpensive, and delicious! Fresh out of the oven, the bread is soft, meaty, and coarsely textured, perfect buttered, or with jam, or as a side with chili. It does, however, go stale faster than you can say "crouton." But! This cornbread still kicks ass. Crumble a stale wedge into a glass and pour some icy-cold milk over it--I swear, you will never eat store-bought cereal again. The coarseness of the bread makes it like a delicious, slightly sweet sponge, and it just soaks up the milk. It's excellent as breakfast or as a snack, especially in the warmer months (this past week has been less than optimal, but Indian Summer will be here soon, gods willing).


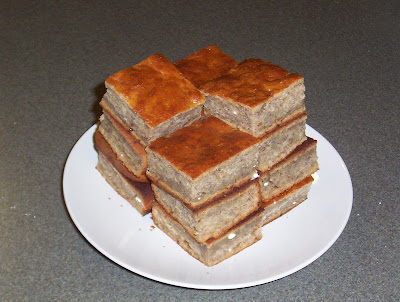
Ronni's Appalachian Cornbread

¼ cup butter or bacon drippings (this is one of the few instances where I think butter is better for cornbread)
2 cups cornmeal
1 tsp salt
½ tsp baking soda
½ tsp baking powder
1 egg
1½ cup buttermilk (I subbed in 1½ cup milk + ¾ tsp white vinegar)
  1. Throw the butter into a 10-inch skillet and pop it in the oven. Set it to preheat to 450F (a similarly wide metal baking pan will work just as well, but you should wait until the oven is heated to put it in)
  2. Mix all the dry ingredients together
  3. Beat the egg into the buttermilk
  4. When the oven heated, combine the wet and dry ingredients
  5. Swish the melted butter around the bottom of the skillet to make sure it's coated, then beat the batter a couple times to make sure it's combined. Pour it into the skillet and slam it back into the oven to bake!
  6. Bake 20-25 minutes, until the top's started to brown
  7. Serve directly from the skillet
The butter, especially if you make this in a baking pan, will flow over the top of the batter, and leave a lovely, salty salty crust. The first time I attempted this with Wynona, I screwed up (forgot to beat the batter before pouring!), and I was short on meal for the redo, so I made up the difference with masa harina, and it seemed to do just fine. (Apart from the bit where I forgot the salt. Ich bin so doof!) I'm going to try doing a cornbread or lightbread recipe with masa harina subbed in for part of the meal/flour at some point, which could come out pretty cool.


So, I moved into North on the 7th, and it was super exciting. We have a huge pantry, and a stove that's not all full of crud (this was a super exciting story I should have posted about. I set the oven in Brown on fire last spring when I was trying to make biscuits. People had used it and made a huge mess...so huge that the heating element was kind of buried under carbonised crud...and I neglected to check the oven before I set it to preheat. When I opened it to put in the biscuits, a huge plume of smoke billowed out! I freaked out, but the RA on duty seemed not to care. I took care of it best I could, and ended up calling my dear friend Anya at, like, eleven at night to let me into her dorm so I could use the oven. When I said this was super exciting, I meat that I was sleep deprived and stressed, so you really just had to have been there :p). Also, a full sized fridge! I can have fresh veggies! Let's neglect the bit where a good portion of the fridge is filled with Busch Light. (My flatmates are jocks/bros, and have little interest in cooking. At least they're not drinking PBR!)

Anyway, the first thing I made in the kitchen was blackbean soup. I'd been trying to come up with exact measurements for a recipe that I made all last spring with Matchstick, but it really doesn't work that way...I just use relative measurements. So, a mess-o-beans became a rather nice blackbean soup.

Blackbean Soup

1 lb blackbeans, soaked or fast-soaked
1 "cheek" green cabbage (about a fifth?)
1 medium onion
2 cloves garlic
Butter (for a vegan version, use olive oil and add some minced celery and a bit of minced carrot)
Cumin seed (about ½ tsp)
2 guajillo chilis (remove the stems!)
Ground cumin (at least 1 tsp, closer to two)
Paprika (at least 1½ tsp)
Parsley (at least 1 Tbsp)
Cilantro (at least 1 tsp)
Ground black pepper
Salt to taste
  1. Dice the onion, shred the cabbage, and peel the garlic. Smash the garlic with the flat of your knife
  2. In the bottom of a larger pot, heat the butter. When it's melted, add the cumin seeds and saute a minute before adding the onion and garlic
  3. Saute the onion and garlic until the onion is translucent and beginning to caramelise
  4. Add the cabbage, and saute it gently until it's wilted. The secret to cooking cabbage without a bad odor is to treat it gently
  5. Once the cabbage is wilted, add the beans, and water to cover. Bring to a boil and add all the spices except the salt. Stir, cover, and turn down the heat to let it simmer
  6. Simmer about an hour (I think), stirring occasionally. After at least an hour, add the salt (the delayed salting keeps the bean skins from becoming tough and impeding the cooking process)
  7. Simmer, covered, stirring occasionally, until the beans are tender. Top up the water as necessary
  8. When the beans are tender, stir the soup and mash beans against the side of the pot. With each stir, you should squish some beans
  9. Simmer, uncovered, until the soup is nicely thickened, adjusting the seasonings and stirring occasionally
This soup is nice and mild, and (in my experience) easy on the stomach. It's not too hot, either. Once you've finished cooking it, you can serve it immediately (it's super good over rice or macaroni, topped with cheddar), or leave it in the fridge. I think it tastes better the day after, because the flavours have had a chance to blend. This is just a basic platform recipe, though. You can change pretty much every element, and add whatever tickles your fancy. I use cabbage because its flavour doesn't intrude on the flavour of the beans and spices, but if you're looking for a darker flavour, spinach, escarole, or beet greens might work well. (Cooking in the greens is also a sneaky way of getting veggies into every meal!)

Last night, I was in a bit of a mood, probably owing to my sore legs (I was so lazy over the summer! I'm not used to so much walking!) and the rainy weather, so I stayed in. Nothing seemed to be helping to lift my mood, but then I decided to take a leaf out of my dear friend Amalie's book, and bake something. Let me tell you, I made the most basic white bread in the book ("the book" being James Beard's Beard on Bread), but it made me feel so much better! The mixing and kneading was just so therapeutic! And the bread came out super nice, too. I have to hurry up and finish the storebought loaf I have so I can start on my new bread! It's waiting for me in the freezer, calling to my stomach~

Basic White Bread
4 cups flour
1 Tbsp yeast
1 Tbsp salt (you could probably go lighter, only 1-2 tsp. Beard is a bit heavy-handed with the salt)
2 tsp sugar
  1. Dissolve the sugar in about ½ cup warm water, then mix in the yeast and leave to proof
  2. Mix the flour and salt
  3. When the yeast has bloomed, add it to the flour, along with enough warm water to make a soft (but not sticky) dough, about 4 cups
  4. Turn out onto a floured surface and knead 3 minutes
  5. Drizzle a little olive oil into the bottom of a bowl. Roll the dough in it to coat it, then cover the whole kit and caboodle with a clean cloth and let it rise at least 1 hour, until its volume's doubled
  6. Punch down the dough, knead three minutes, then let it sit for 5 minutes
  7. Repeat the oiling procedure in a loaf pan, and allow the dough to rise again in the loaf pan. You might want to preheat the oven now (400F), and leave the pan near the oven vent so it gets a little more warmth
  8. Let the dough rise 40-75 minutes, until doubled
  9. Let it bake at 400F for 40-50 minutes, until the top sounds hollow when tapped, the loaf can be easily slipped from the pan, and the bottom is also crisp and sounds hollow
  10. Allow 2 hours for the fresh loaf to cool before slicing it
I had a slice before I put the loaf in the freezer, and it was super delicious. I'm excited to start eating it! Sometime, I may pick up some wholewheat flour and make wholewheat loaves with this recipe.

I made a stop by the Amherst farmers market today, and it was pretty neat. There were a lot of very nice (organic!) vegetables and fruits, and also a couple organic bakeries selling bread. The prices are a bit high, even for local agriculture, so I only picked up a couple things: a couple nice bell peppers, a pound of organic broccoli (I AM SO STOKED TO EAT THIS), and--I was sooooo excited when I saw them!--four green zebra tomatoes! Green zebras are lovely, lovely tomatoes, and often hard to find. They're usually sold by organic growers, or farmers growing heirloom tomatoes. They're kind of "dinosaur-egg-looking," to quote Gab of the Bent Spoon, with green flesh and yellow/golden streaks or spotting. They're a little larger than golfballs, and deliciously sweet. I already ate one...but the others are destined for cooking. Not sure in what yet :p

Speaking of vegetables, I'm going to slip in a little about dinner tonight. It was a bit of an experiment. I've heard a bit about eating beet greens like spinach, and Matt'n'Gab have mentioned how nice they are wilted with other greens, and since I happened to have a bunch of beets, I decided to "use the whole plant," as it were. I prepped a couple beets, and as they were simmering I took all the leaves, cut off the stems, and cleaned them like spinach, then cut them into wide, stubby strips. I sauteed some chopped onion and minced garlic in olive oil, then added the greens and cooked them until they were all nicely wilted and reduced (they lose less bulk than spinach). I plated the greens, replenished the oil in the pan, and made a batch of scrambled eggs to go along with the beets and greens. By the time the pan cooking was finished, the beets were done, and I dressed them with a little butter.

Here's a very "meta" shot of my lovely dinner--you can see my post in progress! And also, the copy of Joy that my mom gave me, and Chinese Regional Cooking, which my grandmother gave me. Yaye for two of my favourite cookbooks being in the shot!

The trio went really well together. The greens and beets complimented each other, and the greens went really well with the eggs. The beet greens were quite a lot like a slightly tougher spinach, although also with a darker, and slightly more bitter flavour. I would call the flavour "mature," because it's fully-rounded, and not at all frivolous. I'm a fan! Whenever I get beets, I'll be sure to keep the greens.

So, yaye cooking! Yaye for new post! Also, many apologies to Matchstick for not sending this to you to beta, but I'm eager to post after such a long silence. I promise I'll send my next post to you :)

Thursday, January 1, 2009

Yaye!!!

Happy New Year to everyone!!! I'm very sorry I haven't been posting. School and life have just been insane, and I don't know where to start from with backlog :p Aaaanyway, hopefully I'll be back soon!!! A happy and healthy new year to everyone!!!

Wednesday, October 1, 2008

Review: Thai Corner

So, last Friday Matchstick and I went out to dinner, since I got my last paycheque from work in the mail. We'd been to Antonio's a few nights before, so we wanted to try something different. Arigato was a little out of our price range, and Fresh Side was bound to be crowded...where to go? I remembered that there was a little Thai place just down the alley by Antonio's, so after some short deliberation we decided to try it out.

Thai Corner is actually in the plaza off Main Street, but it's quicker to take the little (and I do mean little! It's exactly wide enough for one person) alley next to Antonio's. It's next to a little pho shop, which is also on my list of places to try, but rather farther down. Entering Thai Corner, you're greeted by brightly coloured walls, photos of Thailand, and paintings and silhouettes. The place is rather small, and probably always sounds busy. One of the things I liked about the layout of the restaurant is that you can catch a glimpse of the kitchen from the "audience," which is somehow comforting in a small eatery (and the sight of fresh rice coming out of the steamer made me do a little happy dance inside). The menu is large enough to provide variety, and do a good job of explaining exactly what is in each dish.

Matchstick and I both got varieties of curry. We were told that his was of medium heat, while mine was the hottest they served. He had gang kari with chicken, while I had gang bha with beef. The dishes were presented well, with heaping portions of fresh jasmine rice. The gang bha had the appearance of a clear broth, the vegetables in it were cooked just right--tender crisp. The beef was tender and had absorbed the flavour of the curry. While the heat of the curry did grow as I ate, it wasn't as hot as I had hoped.
The gang kari was a yellow curry, of mild spice. It had the characteristic sweetness of yellow curry (or rather, the sweetness I tend to expect), and the potatoes in it had absorbed quite a lot of flavour. The spices could, however, suffer to be toned up quite a bit. The vegetables and chicken were cooked well, and were flavourful.
The issues we had with both curries were the thinness of the curry and the portion sizes. Thai curries are, in general, quite thin, more like soups, but these were just a little thinner than I am accustomed to. The upside of this, I suppose, is that the sauce was more readily absorbed when it was poured over the rice. As for the portions, they were decent, but could definitely do with a little bulking up. They needed more everything, but most of all more meat (I guess that's my American prejudice coming through *laugh*).
The rice was perfectly cooked, and plentiful. You cannot believe how happy it made me to finally have a bowl (well, it was on a plate...) of good rice. Fragrant, sweet, neither too soft nor underdone...The DCs are absolutely incapable of cooking rice and pasta, so when I get to have the real thing it's amazing. Thai Corner definitely understands the importance of rice, and more importantly can prepare it well.

In all, although it wasn't spectacular, Thai Corner is a nice little place. It definitely deserves another visit--I haven't had their pad thai yet! While perhaps a little too tame in terms of flavour for those familiar with Thai cuisine, it's definitely a place everyone can enjoy. Yes, even poor college students; the prices are quite reasonable. Go check it out if you're in the area!

Of course, being the bottomless pits that we are, Matchstick and I were hungry a few hours later. The kitchen in the mod was...disgusting, and the sink was piled so high with EVERYONE ELSE'S DISHES that we couldn't even reach the tap for water... The obvious solution, of course, was to order Wings (prime food for college students: cheap, yummy, and ubiquitous! Just look around for "Wings over *insert town name here*")--a honey barbecue DC-10 and large fries. Yum yum! Saturday we had a big production and cleaned the kitchen. It was fantabulous, by which I mean we both wanted to kill his flatmates afterwards. We reclaimed all his implements, and all was good.

Saturday, we visited a farm stand near Hampshire, which was awesome fun in the mud (he wore his "hooker boots," since they're the only waterproof shoes he owns. Four inch heels!!). We bought a large container (I want to say quart) of little tomatoes--about golf ball size--a butternut squash, and six little sugar pumpkins. We haven't done anything with the pumpkins or squash yet (pumpkin soup is on the agenda!!!), but we did start on the tomatoes. Let me just say that they're absolutely heavenly. I need to go back before the season ends and buy myself some! Maybe even try preserving a few...I should try to find the New York Times recipe. Anyway, those little fuckers are so juicy and sweet it's hard to keep yourself from having another...and another...and another... Matchstick's been making BLTs with them. Sounds so delish!! I hope we'll be able to enjoy plenty of good produce from that farm stand before the season ends. Samhaintide is coming up fast, and the season doesn't last too much longer after that!

Wednesday, September 10, 2008

Génoise and mousseline, moving in, and other oddities

Ah, how time flies! Already, I'm in the second week of school!! So, this is my first post of the year! Yaye! I'm glad to be back at UMass, even if I have to eat DC food :p But I've had plenty of opportunity to cook already! And, I've gotten to use the brand-new cookware my mother and nonna bought for me :) Thank you so much!! I <3 you both lots and lots!

Anyway, before the epic moving-in day, we had one last family dinner at home: me, my brother, nonna, mother, and father all at the table for one last time before the insanity of autumn set in. With our antipasti we had some prosecco, which is, as Gab said, "the Italian answer to champagne." As its name suggests, prosecco is a dry sparkling wine, much closer to the character of champagne than asti spumante. It's quite nice (you may be seeing another post about it near Yuletide ;) ). Nonna made some absolutely amazing lasagna...I still have a little morsel in my fridge which is screaming "EAT ME!!" I've been saving it because I don't want to run out, as silly as that sounds. Anyway, for a finish to the delicious meal, I made "little 'layer cakes.'" I sandwiched dark chocolate mousseline (generally referred to simply as "mousse") between two rounds of génoise cake and chilled it. For a first try, it went pretty well. I definitely want to develop this recipe further; I feel as though it could become a very refined and delicious dessert.
So, there were a few setbacks with this recipe... First, I had no cake rings and the cutters I used for the rings were three inch rings. Second, I discovered at the last moment that we had no lemon (for the cake) or Cointreau (for the mousseline). Third, I absolutely suck at icing. Despite that, I think things turned out well. Here's my recipe...First gen, if you will *laugh*:

Orange Génoise

6 large eggs
3/4 cup sugar
1/2 tsp vanilla
1/2 tsp orange extract (this is where the lemon zest would go usually)
1 cup sifted flour
1 tbsp melted butter
  1. Prep a 9 x 13 pan by buttering its whole interior, then dusting it with flour, tapping out all the excess
  2. Combine the eggs, sugar, vanilla, and orange extract in a bowl (I use the mixer bowl) and whisk over boiling water until just warm, about 1/2 min. Be sure to whisk the whole thing evenly, or you'll end up with little bits of scrambled egg on the sides of the bowl
  3. With the whisk attachment, beat the egg mixture at a high speed for 6-8 min., until pale yellow "and the consistency of a light mayonnaise." Not having ever made mayonnaise, I couldn't say what that is, but you end up with a light yellow foam, which is quite thick. be careful of overworking the eggs at this point (i.e., don't go more than 8 minutes in the mixer) or the cake may not behave properly when it's baking
  4. Add the flour by sprinkling it over the surface of the egg mixture and folding it in, portion by portion
  5. Fold in the melted butter (occasionally I forget this step ^^; if you're silly like me and do that, don't worry, the cake won't be ruined)
  6. Bake at 350°F for 25-30 minutes
  7. When finished, allow to cool completely before removing from the pan and cutting into circles
Chocolate Mouselline

4 eggs, separated
3/4 cup confectioner's sugar (or what Mastering the Art calls "instant sugar," whatever that is)
1/4 cup Drambuie (usually an orange liqueur, such as Cointreau, is used)
6 ounces bittersweet chocolate
1 shot espresso (actually, a café restretto would be even better...)
1 1/2 sticks softened unsalted butter (don't make the mistake of using salted butter--the result is pretty nasty, IMO)
1 tbsp granulated sugar
  1. Beat the egg yolks and sugar together until it is thick, pale yellow, and forms the ribbon
  2. Beat in the Drambuie
  3. Set the bowl over not-quite-simmering water and beat for 3-4 min., until foamy and too hot for your finger
  4. Remove and beat over cold water for another 3-4 min., until it is cool again and forms the ribbon
  5. Melt the chocolate with the coffee over hot water
  6. Remove from the heat and beat in the butter a little at a time
  7. Beat the chocolate mixture into the yolks
  8. Beat the egg whites until they form soft peaks. Sprinkle the sugar over them, then beat until they form stiff peaks
  9. Stir one fourth of the whites into the chocolate and yolk mixture. Fold in the remainder
  10. Chill until firm
Assembly
  1. Spread a thick layer of mousseline on a circle of génoise. Top with a second circle
  2. Chill the cakes in the refrigerator
  3. Make a whipped cream with minimal flavouring
  4. Before serving top each cake with a healthy spoonful of whipped cream
The génoise actually came out quite well. The one immediate issue with it was that I didn't have any lemon zest, so I substituted 1/2 tsp of orange extract. The result was nice, but I definitely should have cut out the vanilla and made it simply an orange-flavoured cake, maybe even using a full teaspoon of extract. Secondarily, I thought that the cake was too dry. That is one of the main characteristics which differentiates génoise from sponge cake. In Antique Bakery (is it sad that I base some of my decisions on a manga?), it's often soaked or brushed with liqueur or syrup, so I think next time I do this I'll make a sort of orange syrup to moisten the cake with, and maybe cut the cake so it's thinner.
The mousseline was a lot of work. I need to build up my arm muscles so I can keep up with all the whisking! It was totally worth it, though. It was very rich and chocolaty, and didn't fall at all. I did, however, think that the chocolate was a little too strong for this use. Perhaps I should use a lighter chocolate next time. Also, as much as I love Ghiradelli, their chocolate has a sour aspect to it which I wasn't thrilled about here. In other recipes, like chocolate chip cookies, it's fine, but here it was a little too pronounced. Perhaps if I have the money I'll see if I can get some E. Guittard, the brand used at the Spoon. Also, the Drambuie could have suffered to be a bit more pronounced. I'll play with the proportions to see if I can get it to speak up a bit.
As for the whipped cream, I've pretty much got the method of whipping down pat. I never end up with cream which is grainy or too close. As far as flavourings go, for this recipe (and probably for many others), you needn't flavour the cream at all; otherwise, it's too heavy and muddles the dessert.
This is a recipe I'm definitely going to develop further.

So, on moving-in day, Matchstick met me to help me move in, and our mothers went off to have a light lunch at the Rt. 9 Diner, where we later met them and had a quick dinner. Then, we all went on a grocery adventure! Matchstick's mother got him a big load of essentials, and my mother got me four Goya ginger beers and a bag of Starbucks French Roast. Thanks so much mom!! Goya's ginger beer is absolutely the best. And I fell in love with the coffee as soon as I made my first cup! It makes an excellent French press.

So, in these first two weeks, we've already had some fun adventures. First, was a beef adventure. Matchstick had forgotten to put the 2+ lbs of ground beef his mother had bought him in the freezer, so it had just been sitting in the fridge...O no!! You really do have to freeze meat right after buying it if you're planning on storing it for a long time. But it wasn't a problem. We cooked it up with a pound of black beans, half a yellow onion, and healthy helpings of parsley, chili powder, paprika, salt, pepper, and crushed cumin seeds (we accidentally got whole seeds instead of ground, so I "minced" them with one of the super-duper awesome knives his flatmate Adrienne brought). We used pretty much the method we used in the taco recipe, but with rather more water to cook the beans thoroughly. I guess it was a bit like chili, the method we used, but with rather fewer ingredients. We froze the whole lot and had some with buttered ziti a few nights later. We topped it with some smoked cheddar that his flatmate Jake gave us (bless his hippie soul), which was quite good. I definitely think our "chili" needed more seasoning...I need to stop being so afraid of overspicing everything!
You know what it needed (apart from less paucity *laugh*)? Blair's. When my mother got me my new cookware, she also got me a bottle of Blair's Original Death Sauce. Let me just say that it's sooooo gooooood!! I remember eating Blair's Death Rain Chips in middle school... O, I did love them so. This sauce is "all this and more!" I made myself a batch of scrambled eggs loaded up with Blair's--so good!! I might actually make some tonight for a snack.

Last night, I was over at Matchstick's and we were at a loss for what to make, so I pulled out a bag of lentils and we made lentil soup. I love lentils. They're one of my favourite beans, and they make the most excellent soups, stews, and porridges. Lentil soup is exceptionally easy to make, very hearty, very filling, and very healthy.

1 pound lentils
4 cups water (or chicken stock)
2 chicken bullion cubes (omit these if using stock)
1 clove garlic, a little coarser than minced
1/2 yellow onion, chopped between coarse and fine
4 potatoes, in smaller cubes
3 carrots, in rounds or half-moons
Butter, butter, and more butter
Salt and pepper to taste
  1. In your soup pot, melt a bit more butter than you would generally need
  2. Sauté the garlic, then add the onions
  3. When the onions begin to caramelise, add the carrots
  4. When the carrots begin to become tender, add the potatoes
  5. When the potatoes have begun to soften on the outside, add some water to the pot to deglaze it
  6. Add the lentils, water, and bullion. Bring to a boil
  7. Boil 5 minutes, covered, stirring occasionally
  8. Simmer, covered, adding water as needed, until the the potatoes are completely cooked
  9. Season with salt and pepper
  10. Simmer, covered, until the soup is very thick
This was delicious, but we were a little too light on the salt. It was good over pasta, but I think it would go better with rice. I'm looking forward to making this in the winter; I think it'll be an excellent cold-weather food.

Friday, August 22, 2008

Lemony Meringues!!

So, since I was working Monday (egg day at the Spoon!!), I got to take home a pint of delicious eggwhites! One of the easiest, most versatile things you can make with these is meringue. It's one of the most basic French dessert techniques. Today, I decided to try making lemon meringues, chock-o-block full of lemon zest. I pretty much just built off the Jaques Pépin recipe:


1/2 (give or take) cup egg whites (4-ish whites)
1 cup sugar
zest of four lemons
  1. Beat whites until they begin to hold their shape
  2. Beat in 1/2 cup sugar, continuing to beat until shiny and stiff
  3. Fold in the sugar and lemon zest, a bit at a time
  4. Pipe or spoon onto parchment-lined baking sheets
  5. Bake at 200°F for 2.5 hours

These came out quite well, I think. They're crisp and crunchy, and plenty sweet, with a definite citrus flavour. They retained the yellow colour imparted by the lemon zest, although they did caramelise a little bit. I'm very happy with these, although I think they could suffer a pinch of salt to balance the sugar, and maybe a drip or two of lemon juice to give them just a little more tartness. Experiments for next time!