Anyway, before the epic moving-in day, we had one last family dinner at home: me, my brother, nonna, mother, and father all at the table for one last time before the insanity of autumn set in. With our antipasti we had some prosecco, which is, as Gab said, "the Italian answer to champagne." As its name suggests, prosecco is a dry sparkling wine, much closer to the character of champagne than asti spumante. It's quite nice (you may be seeing another post about it near Yuletide ;) ). Nonna made some absolutely amazing lasagna...I still have a little morsel in my fridge which is screaming "EAT ME!!" I've been saving it because I don't want to run out, as silly as that sounds. Anyway, for a finish to the delicious meal, I made "little 'layer cakes.'" I sandwiched dark chocolate mousseline (generally referred to simply as "mousse") between two rounds of génoise cake and chilled it. For a first try, it went pretty well. I definitely want to develop this recipe further; I feel as though it could become a very refined and delicious dessert.
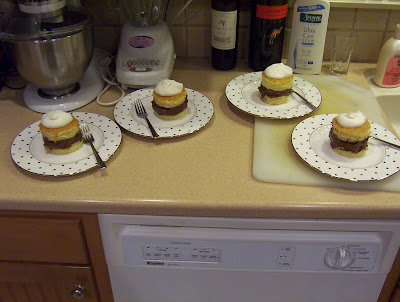 So, there were a few setbacks with this recipe... First, I had no cake rings and the cutters I used for the rings were three inch rings. Second, I discovered at the last moment that we had no lemon (for the cake) or Cointreau (for the mousseline). Third, I absolutely suck at icing. Despite that, I think things turned out well. Here's my recipe...First gen, if you will *laugh*:
Orange Génoise
6 large eggs
3/4 cup sugar
1/2 tsp vanilla
1/2 tsp orange extract (this is where the lemon zest would go usually)
1 cup sifted flour
1 tbsp melted butter
- Prep a 9 x 13 pan by buttering its whole interior, then dusting it with flour, tapping out all the excess
- Combine the eggs, sugar, vanilla, and orange extract in a bowl (I use the mixer bowl) and whisk over boiling water until just warm, about 1/2 min. Be sure to whisk the whole thing evenly, or you'll end up with little bits of scrambled egg on the sides of the bowl
- With the whisk attachment, beat the egg mixture at a high speed for 6-8 min., until pale yellow "and the consistency of a light mayonnaise." Not having ever made mayonnaise, I couldn't say what that is, but you end up with a light yellow foam, which is quite thick. be careful of overworking the eggs at this point (i.e., don't go more than 8 minutes in the mixer) or the cake may not behave properly when it's baking
- Add the flour by sprinkling it over the surface of the egg mixture and folding it in, portion by portion
- Fold in the melted butter (occasionally I forget this step ^^; if you're silly like me and do that, don't worry, the cake won't be ruined)
- Bake at 350°F for 25-30 minutes
- When finished, allow to cool completely before removing from the pan and cutting into circles
4 eggs, separated
3/4 cup confectioner's sugar (or what Mastering the Art calls "instant sugar," whatever that is)
1/4 cup Drambuie (usually an orange liqueur, such as Cointreau, is used)
6 ounces bittersweet chocolate
1 shot espresso (actually, a café restretto would be even better...)
1 1/2 sticks softened unsalted butter (don't make the mistake of using salted butter--the result is pretty nasty, IMO)
1 tbsp granulated sugar
- Beat the egg yolks and sugar together until it is thick, pale yellow, and forms the ribbon
- Beat in the Drambuie
- Set the bowl over not-quite-simmering water and beat for 3-4 min., until foamy and too hot for your finger
- Remove and beat over cold water for another 3-4 min., until it is cool again and forms the ribbon
- Melt the chocolate with the coffee over hot water
- Remove from the heat and beat in the butter a little at a time
- Beat the chocolate mixture into the yolks
- Beat the egg whites until they form soft peaks. Sprinkle the sugar over them, then beat until they form stiff peaks
- Stir one fourth of the whites into the chocolate and yolk mixture. Fold in the remainder
- Chill until firm
- Spread a thick layer of mousseline on a circle of génoise. Top with a second circle
- Chill the cakes in the refrigerator
- Make a whipped cream with minimal flavouring
- Before serving top each cake with a healthy spoonful of whipped cream
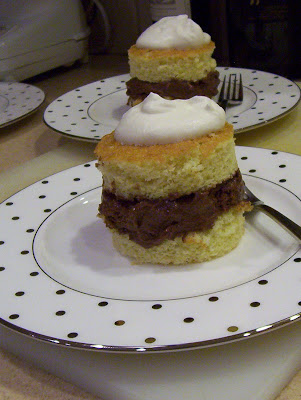
The mousseline was a lot of work. I need to build up my arm muscles so I can keep up with all the whisking! It was totally worth it, though. It was very rich and chocolaty, and didn't fall at all. I did, however, think that the chocolate was a little too strong for this use. Perhaps I should use a lighter chocolate next time. Also, as much as I love Ghiradelli, their chocolate has a sour aspect to it which I wasn't thrilled about here. In other recipes, like chocolate chip cookies, it's fine, but here it was a little too pronounced. Perhaps if I have the money I'll see if I can get some E. Guittard, the brand used at the Spoon. Also, the Drambuie could have suffered to be a bit more pronounced. I'll play with the proportions to see if I can get it to speak up a bit.
As for the whipped cream, I've pretty much got the method of whipping down pat. I never end up with cream which is grainy or too close. As far as flavourings go, for this recipe (and probably for many others), you needn't flavour the cream at all; otherwise, it's too heavy and muddles the dessert.
This is a recipe I'm definitely going to develop further.
So, on moving-in day, Matchstick met me to help me move in, and our mothers went off to have a light lunch at the Rt. 9 Diner, where we later met them and had a quick dinner. Then, we all went on a grocery adventure! Matchstick's mother got him a big load of essentials, and my mother got me four Goya ginger beers and a bag of Starbucks French Roast. Thanks so much mom!! Goya's ginger beer is absolutely the best. And I fell in love with the coffee as soon as I made my first cup! It makes an excellent French press.
So, in these first two weeks, we've already had some fun adventures. First, was a beef adventure. Matchstick had forgotten to put the 2+ lbs of ground beef his mother had bought him in the freezer, so it had just been sitting in the fridge...O no!! You really do have to freeze meat right after buying it if you're planning on storing it for a long time. But it wasn't a problem. We cooked it up with a pound of black beans, half a yellow onion, and healthy helpings of parsley, chili powder, paprika, salt, pepper, and crushed cumin seeds (we accidentally got whole seeds instead of ground, so I "minced" them with one of the super-duper awesome knives his flatmate Adrienne brought). We used pretty much the method we used in the taco recipe, but with rather more water to cook the beans thoroughly. I guess it was a bit like chili, the method we used, but with rather fewer ingredients. We froze the whole lot and had some with buttered ziti a few nights later. We topped it with some smoked cheddar that his flatmate Jake gave us (bless his hippie soul), which was quite good. I definitely think our "chili" needed more seasoning...I need to stop being so afraid of overspicing everything!
You know what it needed (apart from less paucity *laugh*)? Blair's. When my mother got me my new cookware, she also got me a bottle of Blair's Original Death Sauce. Let me just say that it's sooooo gooooood!! I remember eating Blair's Death Rain Chips in middle school... O, I did love them so. This sauce is "all this and more!" I made myself a batch of scrambled eggs loaded up with Blair's--so good!! I might actually make some tonight for a snack.
Last night, I was over at Matchstick's and we were at a loss for what to make, so I pulled out a bag of lentils and we made lentil soup. I love lentils. They're one of my favourite beans, and they make the most excellent soups, stews, and porridges. Lentil soup is exceptionally easy to make, very hearty, very filling, and very healthy.
1 pound lentils
4 cups water (or chicken stock)
2 chicken bullion cubes (omit these if using stock)
1 clove garlic, a little coarser than minced
1/2 yellow onion, chopped between coarse and fine
4 potatoes, in smaller cubes
3 carrots, in rounds or half-moons
Butter, butter, and more butter
Salt and pepper to taste
- In your soup pot, melt a bit more butter than you would generally need
- Sauté the garlic, then add the onions
- When the onions begin to caramelise, add the carrots
- When the carrots begin to become tender, add the potatoes
- When the potatoes have begun to soften on the outside, add some water to the pot to deglaze it
- Add the lentils, water, and bullion. Bring to a boil
- Boil 5 minutes, covered, stirring occasionally
- Simmer, covered, adding water as needed, until the the potatoes are completely cooked
- Season with salt and pepper
- Simmer, covered, until the soup is very thick