Showing posts with label recipe. Show all posts

Sunday, October 24, 2010

Samhain, Returns, Bananas

Well, I haven't posted in a year and twelve days, and since "a year and a day is the pagan way," I figure I should get back into posting here, since I miss it. Long story short, last year was Hell Semester, parts II and III (this semester might be part IV, but fuck it). On top of that, my mother passed away in January, and a good friend of mine took her own life at the end of August, so life was just pretty terrible in general. Needless to say, I did a lot of comfort eating.
On the lighter side of things, I discovered that, despite the insanely unhealthy things I was comfort-eating, I am probably the only person in the world who will lose weight when he subsists on junk food and antipasti. Thankfully, I've gained back much of my prodigal poundage, so I'm fractionally less twiggy than I was when I came back to school. All this food talk brings us to...

Samhaintide Banana Bread
(version 1)

Banana Bread!

So, it turns out that the pantry in my apartment is a really good place to (over)ripen fruit. The bananas that were perfect on Friday were quite beyond ripe this afternoon. Solution? Make spiced banana bread! This was my first attempt at writing my own cake recipe, so it still needs tweaking here and there, but preliminary results are delicious!

4 bananas, mashed
1 stick butter
¾ cup white sugar
¼ cup tightly packed brown sugar
1 tsp cinnamon
¼ tsp nutmeg
¼ tsp ground cloves
1 Tbsp 1 tsp bourbon
2 eggs
2 cups flour
2½ tsp baking powder
Pinch of salt

  1. Preheat the oven to 350˚F
  2. Beat together the banana pulp, brown sugar, cinnamon, nutmeg, cloves, bourbon, and eggs
  3. In a saucepan, melt the butter over low heat. As it melts, whisk in the white sugar until it is quite smooth
  4. Let the butter/sugar mixture cool a little, then beat it into the banana mix
  5. Blend in the flour, salt, and baking powder
  6. Pour into a 9x9 cake pan and bake for one hour, or until a toothpick stuck in the cake's centre comes out clean
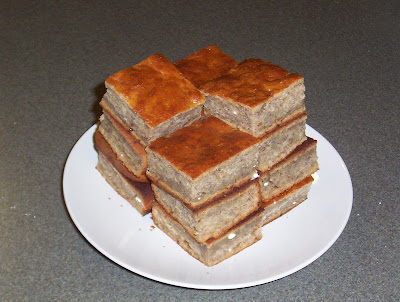
This cake is very dense and spicy and delicious. And best of all, it's healthy for you! (Totally! It's got bananas and everything!) A good use for overripe bananas, especially when the weather calls for this sort of spicy confection. The cake didn't quite rise the way I wanted it to, and it baked a little odd (maybe I should have baked it in glass instead of lovely, non-stick silicone?), so I need to tweak the amount of flour, and maybe add an egg. Also, another tablespoon of bourbon wouldn't go amiss. But, all in all, it is very delicious.
Glad to be back and posting again~ Stay tuned for version 2 of this recipe! Also, coming up in my next post, one of the richest, beefiest stews you'll ever eat. 'Til then, eat well!

Monday, October 12, 2009

Pintos, Chicken, Laziness

Hello, hello! I'm actually posting again! Will this become a regular thing? Hope so!
So, school's been crazy busy (of course), but I've been feeding myself plenty well (yaye!), so I have a few things to post about.


So, Wynona had her first batch of cornbread in the apartment, and it was probably the best batch I've made so far. I don't know what I did differently, but the batter came together much better that it usually does...it was actually a batter instead of meal in liquid. Perhaps it's because I used whole milk? In any case, I devoured it almost instantly. It was rather nice with sour cherry preserves.

So, being a college student, I'm rather lazy. Enter the lazy supper! It takes about half an hour to make, depending on how fast you prep spinach, and really requires very little work apart from that.


Lazy supper consists of spinach, scrambled eggs, bacon, and corn pone. (This corn pone recipe is from Crescent Dragonwagon's Cornbread Gospels.) The first thing you do is start the corn pone. Set the oven to preheat to 375F while you throw 2 cups of corn meal, 1 tsp salt, and 1 tbsp drippings (or butter)into a bowl and pour 2 cups boiling water over them. Give the mix a few good stirs and let it sit 5 to 10 minutes. While it sits, prep your spinach, and scramble your eggs. Check your corn mash. If it's cool enough to handle, form pones about 1/3 inch thick, put them on an oiled baking sheet, and throw them in the oven. Otherwise, fry up your bacon first, making sure it renders up a good amount of grease (oooo, yummy yummy bacon grease!). At this point, the pones should definitely go in the oven, for about 15 minutes. While they bake, saute your spinach until it's just cooked, and plate it with the bacon. Make sure you get all the pot-liquor, too--the pones will soak it up and be super delicious! Now come the eggs. Replenish the pan's fat if you need to. Your eggs should be perfectly cooked as soon as the pones are ready. Plop a couple pones on your plate, add the eggs, pour yourself a nice, cold glass of milk, and dig in!

I haven't been entirely lazy, though. Weekends are my big cooking days, and I've done two big projects that I'm rather proud of. The first is a roast chicken. This method is actually one that Matchstick and I developed last year, and it's totally one of my favourites.
  • Remove the giblets and rinse the chicken inside and out. Pat dry with paper towels. Remove that silly, useless pop-up timer!
  • Place the chicken in a roasting pan, and tuck its wings back. I'm not sure how to explain how to do this, but you kind of twist the tips of the wings around to the wrong side, behind the shoulder blades...if you have questions, better consult Julia Child.
  • Slice an orange, squeeze half of it all over the chicken. Stuff both halves into the cavity.
  • Peel and halve an onion, and stuff that into the cavity too.
  • Sprinkle the chicken with ground cloves, salt, and a little pepper.
  • Roast at 350F until the temperature is 180F on the meat thermometer, or until the drumsticks are loose and wiggly when you jiggle them.
  • Let the chicken rest 10 minutes before carving.
This recipe always comes out moist, even without basting, and I really love the spicy note the cloves add.

One of the benefits of roasting a whole chicken, instead of just thighs (or whatever), is that you can make your own chicken stock! And, since it's getting to be that time of year, when everyone suddenly catches dorm (or homeroom) plague, there's nothing better to have on hand than a nice batch of Yiddish penicillin. Home made chicken stock is so fantastic, and almost guaranteed to cure whatever ails you! So, once you've carved your chicken thoroughly, don't throw away that carcass! Put it in a pot with the wings, and maybe even the leg bones, throw in the giblets, three ribs of celery, one or two scrubbed and broken carrots, some peppercorns, and a dash of salt. Add enough cold water to cover everything and fill the pot. Bring the pot nearly to a boil, skim any scum that formed, and set it to simmer, covered, for...well, for as long as you feel like. Longer is usually better. You want to extract all the chickeny goodness you can. You should skim the pot occasionally. After, o, six hours, taste the stock. You may want to simmer it down a bit if it seems weak, but when you deem it finished, strain your stock into a separate container. You'll probably have enough to freeze a good portion and still have enough for soup. If you're going to make chicken soup straight away, you can pick the meat from the carcass and add it to the soup, along with slices of the carrot you used for the stock.

My second project is the beginnings of a recipe for pinto beans. Inspired by my success with blackbean soup, I decided to be daring, and came up with something rather nice, but definitely in need of some tweaking:
  • 1 lb dried pinto beans, soaked
  • 3 ribs celery, chopped
  • 1 "cheek" cabbage, shredded
  • 1 onion, chopped
  • 3 cloves garlic, smashed
  • 4 strips bacon, chopped into medium chunks
  • 1/2 tsp cumin seed
  • 2 costeño chilis
  • 1 ancho chili
  • 3 chilis de arbol
  • 3/4 tsp cumin
  • 3/4 tsp paprika
  • 1/4 tsp cinnamon
  • 1.5 cups chicken stock
  • Salt to taste
  1. Set the costeños and ancho to soak in a bowl of hot tapwater
  2. Fry the bacon in the bottom of a large pot, stirring it to make sure it renders all its fat
  3. When the bacon is crispy, remove it from the pot, and toss in the cumin seed and garlic. Saute a few minutes
  4. Add the onion, and cook until they begin to turn yellow
  5. Add the celery and cabbage, cooking until the cabbage is well wilted
  6. Remove the costeños and ancho from the water, and squeeze them out. Discard the water and chop the peppers. Add them to the pot
  7. Wash your hands really well. The capsacin from the peppers will cling to your hands, and if it gets in your eye by accident, bad things would ensue
  8. Add the beans, bacon, and chilis de arbol
  9. Add the chicken stock, and enough water to cover everything
  10. Add all the spices except the salt, and stir well
  11. Bring to a boil, and simmer, covered, until the pintos are nice and soft
  12. Stir the beans, and mash a good number of them against the side of the pot as you do
  13. Add salt to taste, and simmer until nice and thick
  14. Serve over rice or macaroni!
I like the way the bacon compliments the meatiness of the pintos, and the sweetness that the ancho chili adds. The cinnamon definitely is a nice addition, but I need to fiddle with the seasonings a bit. I definitely need to up the heat, probably with more chilis de arbol, and maybe a couple other varieties of pepper...maybe pasillas. I might add a pinch of cocoa, too, to balance the sweetness of the peppers with the pungency of the cinnamon.

Well, that's all for now. Next time, snickerdoodles!

Saturday, September 12, 2009

*Cough* *Taptaptap* Is this thing on?

Eheh...So, I've been officially delinquent. But! I'm back at school, and in the North Apartments! So I have a kitchen and am cooking almost all of my meals! That's super exciting.

Matchstick pointed out to me that it's been about nine months since my last post. And that's kind of a gestation-ish length of time, so what better time for Coquus Macer to be born anew! Dude, I'm totally serious about doing this. Seriously.

...or at any rate, I'm going to try hard! がんばりますよ!

So, over the summer, my super fantastic mom got me a nice bunch of new cookware. I've gotten to play around with most of it. One of the most exciting pieces she got for me is my very first cast-iron skillet. I named her Wynona. Wynona is fantastic, and her inaugural recipe was Southern cornbread.

This is a recipe that I've been fond of for some time now, ever since Matchstick bought me The Cornbread Gospels, by Crescent Dragonwagon. It's super-simple, fast, inexpensive, and delicious! Fresh out of the oven, the bread is soft, meaty, and coarsely textured, perfect buttered, or with jam, or as a side with chili. It does, however, go stale faster than you can say "crouton." But! This cornbread still kicks ass. Crumble a stale wedge into a glass and pour some icy-cold milk over it--I swear, you will never eat store-bought cereal again. The coarseness of the bread makes it like a delicious, slightly sweet sponge, and it just soaks up the milk. It's excellent as breakfast or as a snack, especially in the warmer months (this past week has been less than optimal, but Indian Summer will be here soon, gods willing).


Ronni's Appalachian Cornbread

¼ cup butter or bacon drippings (this is one of the few instances where I think butter is better for cornbread)
2 cups cornmeal
1 tsp salt
½ tsp baking soda
½ tsp baking powder
1 egg
1½ cup buttermilk (I subbed in 1½ cup milk + ¾ tsp white vinegar)
  1. Throw the butter into a 10-inch skillet and pop it in the oven. Set it to preheat to 450F (a similarly wide metal baking pan will work just as well, but you should wait until the oven is heated to put it in)
  2. Mix all the dry ingredients together
  3. Beat the egg into the buttermilk
  4. When the oven heated, combine the wet and dry ingredients
  5. Swish the melted butter around the bottom of the skillet to make sure it's coated, then beat the batter a couple times to make sure it's combined. Pour it into the skillet and slam it back into the oven to bake!
  6. Bake 20-25 minutes, until the top's started to brown
  7. Serve directly from the skillet
The butter, especially if you make this in a baking pan, will flow over the top of the batter, and leave a lovely, salty salty crust. The first time I attempted this with Wynona, I screwed up (forgot to beat the batter before pouring!), and I was short on meal for the redo, so I made up the difference with masa harina, and it seemed to do just fine. (Apart from the bit where I forgot the salt. Ich bin so doof!) I'm going to try doing a cornbread or lightbread recipe with masa harina subbed in for part of the meal/flour at some point, which could come out pretty cool.


So, I moved into North on the 7th, and it was super exciting. We have a huge pantry, and a stove that's not all full of crud (this was a super exciting story I should have posted about. I set the oven in Brown on fire last spring when I was trying to make biscuits. People had used it and made a huge mess...so huge that the heating element was kind of buried under carbonised crud...and I neglected to check the oven before I set it to preheat. When I opened it to put in the biscuits, a huge plume of smoke billowed out! I freaked out, but the RA on duty seemed not to care. I took care of it best I could, and ended up calling my dear friend Anya at, like, eleven at night to let me into her dorm so I could use the oven. When I said this was super exciting, I meat that I was sleep deprived and stressed, so you really just had to have been there :p). Also, a full sized fridge! I can have fresh veggies! Let's neglect the bit where a good portion of the fridge is filled with Busch Light. (My flatmates are jocks/bros, and have little interest in cooking. At least they're not drinking PBR!)

Anyway, the first thing I made in the kitchen was blackbean soup. I'd been trying to come up with exact measurements for a recipe that I made all last spring with Matchstick, but it really doesn't work that way...I just use relative measurements. So, a mess-o-beans became a rather nice blackbean soup.

Blackbean Soup

1 lb blackbeans, soaked or fast-soaked
1 "cheek" green cabbage (about a fifth?)
1 medium onion
2 cloves garlic
Butter (for a vegan version, use olive oil and add some minced celery and a bit of minced carrot)
Cumin seed (about ½ tsp)
2 guajillo chilis (remove the stems!)
Ground cumin (at least 1 tsp, closer to two)
Paprika (at least 1½ tsp)
Parsley (at least 1 Tbsp)
Cilantro (at least 1 tsp)
Ground black pepper
Salt to taste
  1. Dice the onion, shred the cabbage, and peel the garlic. Smash the garlic with the flat of your knife
  2. In the bottom of a larger pot, heat the butter. When it's melted, add the cumin seeds and saute a minute before adding the onion and garlic
  3. Saute the onion and garlic until the onion is translucent and beginning to caramelise
  4. Add the cabbage, and saute it gently until it's wilted. The secret to cooking cabbage without a bad odor is to treat it gently
  5. Once the cabbage is wilted, add the beans, and water to cover. Bring to a boil and add all the spices except the salt. Stir, cover, and turn down the heat to let it simmer
  6. Simmer about an hour (I think), stirring occasionally. After at least an hour, add the salt (the delayed salting keeps the bean skins from becoming tough and impeding the cooking process)
  7. Simmer, covered, stirring occasionally, until the beans are tender. Top up the water as necessary
  8. When the beans are tender, stir the soup and mash beans against the side of the pot. With each stir, you should squish some beans
  9. Simmer, uncovered, until the soup is nicely thickened, adjusting the seasonings and stirring occasionally
This soup is nice and mild, and (in my experience) easy on the stomach. It's not too hot, either. Once you've finished cooking it, you can serve it immediately (it's super good over rice or macaroni, topped with cheddar), or leave it in the fridge. I think it tastes better the day after, because the flavours have had a chance to blend. This is just a basic platform recipe, though. You can change pretty much every element, and add whatever tickles your fancy. I use cabbage because its flavour doesn't intrude on the flavour of the beans and spices, but if you're looking for a darker flavour, spinach, escarole, or beet greens might work well. (Cooking in the greens is also a sneaky way of getting veggies into every meal!)

Last night, I was in a bit of a mood, probably owing to my sore legs (I was so lazy over the summer! I'm not used to so much walking!) and the rainy weather, so I stayed in. Nothing seemed to be helping to lift my mood, but then I decided to take a leaf out of my dear friend Amalie's book, and bake something. Let me tell you, I made the most basic white bread in the book ("the book" being James Beard's Beard on Bread), but it made me feel so much better! The mixing and kneading was just so therapeutic! And the bread came out super nice, too. I have to hurry up and finish the storebought loaf I have so I can start on my new bread! It's waiting for me in the freezer, calling to my stomach~

Basic White Bread
4 cups flour
1 Tbsp yeast
1 Tbsp salt (you could probably go lighter, only 1-2 tsp. Beard is a bit heavy-handed with the salt)
2 tsp sugar
  1. Dissolve the sugar in about ½ cup warm water, then mix in the yeast and leave to proof
  2. Mix the flour and salt
  3. When the yeast has bloomed, add it to the flour, along with enough warm water to make a soft (but not sticky) dough, about 4 cups
  4. Turn out onto a floured surface and knead 3 minutes
  5. Drizzle a little olive oil into the bottom of a bowl. Roll the dough in it to coat it, then cover the whole kit and caboodle with a clean cloth and let it rise at least 1 hour, until its volume's doubled
  6. Punch down the dough, knead three minutes, then let it sit for 5 minutes
  7. Repeat the oiling procedure in a loaf pan, and allow the dough to rise again in the loaf pan. You might want to preheat the oven now (400F), and leave the pan near the oven vent so it gets a little more warmth
  8. Let the dough rise 40-75 minutes, until doubled
  9. Let it bake at 400F for 40-50 minutes, until the top sounds hollow when tapped, the loaf can be easily slipped from the pan, and the bottom is also crisp and sounds hollow
  10. Allow 2 hours for the fresh loaf to cool before slicing it
I had a slice before I put the loaf in the freezer, and it was super delicious. I'm excited to start eating it! Sometime, I may pick up some wholewheat flour and make wholewheat loaves with this recipe.

I made a stop by the Amherst farmers market today, and it was pretty neat. There were a lot of very nice (organic!) vegetables and fruits, and also a couple organic bakeries selling bread. The prices are a bit high, even for local agriculture, so I only picked up a couple things: a couple nice bell peppers, a pound of organic broccoli (I AM SO STOKED TO EAT THIS), and--I was sooooo excited when I saw them!--four green zebra tomatoes! Green zebras are lovely, lovely tomatoes, and often hard to find. They're usually sold by organic growers, or farmers growing heirloom tomatoes. They're kind of "dinosaur-egg-looking," to quote Gab of the Bent Spoon, with green flesh and yellow/golden streaks or spotting. They're a little larger than golfballs, and deliciously sweet. I already ate one...but the others are destined for cooking. Not sure in what yet :p

Speaking of vegetables, I'm going to slip in a little about dinner tonight. It was a bit of an experiment. I've heard a bit about eating beet greens like spinach, and Matt'n'Gab have mentioned how nice they are wilted with other greens, and since I happened to have a bunch of beets, I decided to "use the whole plant," as it were. I prepped a couple beets, and as they were simmering I took all the leaves, cut off the stems, and cleaned them like spinach, then cut them into wide, stubby strips. I sauteed some chopped onion and minced garlic in olive oil, then added the greens and cooked them until they were all nicely wilted and reduced (they lose less bulk than spinach). I plated the greens, replenished the oil in the pan, and made a batch of scrambled eggs to go along with the beets and greens. By the time the pan cooking was finished, the beets were done, and I dressed them with a little butter.

Here's a very "meta" shot of my lovely dinner--you can see my post in progress! And also, the copy of Joy that my mom gave me, and Chinese Regional Cooking, which my grandmother gave me. Yaye for two of my favourite cookbooks being in the shot!

The trio went really well together. The greens and beets complimented each other, and the greens went really well with the eggs. The beet greens were quite a lot like a slightly tougher spinach, although also with a darker, and slightly more bitter flavour. I would call the flavour "mature," because it's fully-rounded, and not at all frivolous. I'm a fan! Whenever I get beets, I'll be sure to keep the greens.

So, yaye cooking! Yaye for new post! Also, many apologies to Matchstick for not sending this to you to beta, but I'm eager to post after such a long silence. I promise I'll send my next post to you :)

Friday, August 22, 2008

Lemony Meringues!!

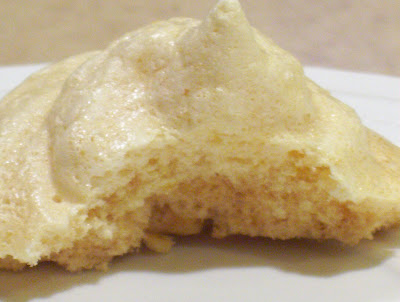
So, since I was working Monday (egg day at the Spoon!!), I got to take home a pint of delicious eggwhites! One of the easiest, most versatile things you can make with these is meringue. It's one of the most basic French dessert techniques. Today, I decided to try making lemon meringues, chock-o-block full of lemon zest. I pretty much just built off the Jaques Pépin recipe:


1/2 (give or take) cup egg whites (4-ish whites)
1 cup sugar
zest of four lemons
  1. Beat whites until they begin to hold their shape
  2. Beat in 1/2 cup sugar, continuing to beat until shiny and stiff
  3. Fold in the sugar and lemon zest, a bit at a time
  4. Pipe or spoon onto parchment-lined baking sheets
  5. Bake at 200°F for 2.5 hours

These came out quite well, I think. They're crisp and crunchy, and plenty sweet, with a definite citrus flavour. They retained the yellow colour imparted by the lemon zest, although they did caramelise a little bit. I'm very happy with these, although I think they could suffer a pinch of salt to balance the sugar, and maybe a drip or two of lemon juice to give them just a little more tartness. Experiments for next time!

Thursday, August 14, 2008

Yaye boi! Culinary Adventures on my Three Month Anniversary

Ah, I've been a very bad blogger. Maybe I need to be spanked... So, I totally didn't write about the week-long adventure of Matchstick in NJ...But I'll try my best to write about some of our adventures in the near future...sometime before I go back to UMass. Anyway:
I went up to RI for two and a bit days to see Matchstick for our 3 month anniversary. So exciting!! This is a first for both of us, having an actual long-term relationship. So that was awesome. On top of that, we got to do some awesome cooking! Yaye!

The first thing we did when I arrived was go to the grocery store and buy things for cooking. Haha aah, we're such food geeks! What did we get? How did we use it? That comes soon! But first, let's talk about absinthe. Absinthe, La Fée Verte, is a liquor made from great wormwood, fennel, hyssop, and several other herbs. It is rather high proof (45%-75% alcohol by volume), and is unique in its drinking ritual--it is diluted in an equal volume of water before being consumed. Three varieties of absinthe exist. Blanche, also known as La Bleu, is clear, having been distilled and then bottled. Verte, the famously green absinthe, owes its colour to a second infusion of herbs. Absenta, a Spanish variant of absinthe, has a slightly different and sweeter flavour, owing to a difference in the herbs used. "Hausgemacht" is a term which refers to home-made, or "microbrewed" absinthe. "Czech absinthe," "Bohemian absinthe," and "absinth" all refer to the same thing--and that thing is emphatically not absinthe. It is, to put it politely, wormwood bitters. What I prefer to call it, well...let's not go there haha.
Anyway, I got the chance to taste a Swiss blanche absinthe. While the full absinthe ritual wasn't performed (sugar is placed in a slotted spoon over the glass of absinthe, and water is poured over the sugar, sweetening and diluting the absinthe--don't burn the sugar!!), it was still a very cool experience. It was fun to watch the louche develop when the water was added. The flavour of absinthe is largely liquorice, but it's slightly bitter, owing to the wormwood. Actually, I suppose it would best be described as having a flavour of liquorice with a slightly disturbing note. Still, very good.

The following afternoon, we made a deliciously evil confection, called brickle. It's deliciously evil because it is essentially crispy crackers embedded in butterscotch and chocolate! And it's so very simple to make!

1 cup butter
1 cup brown sugar
saltines to line a baking sheet (about 40, the written form of the recipe says)
1 "large bag" chocolate chips (actually, however much you need to completely cover the pan of brickle)
  1. Line a baking pan with foil, remembering to crimp the edges. Line the bottom of the prepared pan with saltines
  2. Heat the butter and brown sugar on the stove. When the butter has melted, whisk vigorously to combine
  3. Allow the butter and sugar mixture (butterscotch!!) to simmer for three minutes
  4. Pour the butterscotch over the saltines and spread it evenly
  5. Bake at 400°F for 5 minutes
  6. Pour chocolate chips over brickle, and as they melt spread them evenly over the surface
  7. Refrigerate for 2 hours, then break into pieces. Generally, the brickle will cleave most cleanly along the edges of the crackers
This is a delicious and simple sweet. Anyone with two neurons to rub together can make it. Despite this, there's also room for more advanced techniques to be used. I'd like to play around with the butterscotch a bit, and I'd like to see if I can temper the chocolate so the brickle won't melt so quickly in my hand.

That evening we made tacos for his family, and dinner was quite a nice affair. I've never made taco filling from scratch before, so this was a neat experiment that turned out well! This recipe is a bit (i.e., very) vague, but a lot of this is based on personal tastes.
  • Brown 1.5 lb ground beef in a pan
  • Drain the beef, and set it aside. In the same pan, heat some oil and sauté a clove (or two) of garlic and some (I used one, but at least two are needed) fresh sliced jalapeños. Add a teaspoon or two of coriander and sauté until the garlic begins to caramelise
  • Add the beef, then season with cumin, paprika, cilantro, dried chili pepper, salt, black pepper. Continue to sauté
  • After the beef has become fragrant, add some water to the pan as if you were deglazing the pan. Allow the beef to absorb the water. Repeat this process as you cook the beef and adjust the spices (I actually borrowed this method from the recipe for aloo gobi, in which you add larger amounts of water as you cook the vegetables to make the sauce)
  • Add some finely chopped onion and cook until it is tender, continuing with the water treatment
  • When the seasoning is satisfactory, remove the filling from the heat and portion it into hard taco shells (16 at most)
  • Top with slices of cheese (we used American, but cheddar or pepperjack would do wonderfully)
  • Heat in a 325°F oven until the cheese is melted
  • Serve hot with chopped tomatoes, shredded lettuce, sour cream, salsa, etc.
I think the tacos turned out pretty well, and I was proud that I didn't use any spice mixes. I do need to stop being afraid of overspicing things, though. I definitely needed to "kick it up a notch!" More pepper and onion, and more paprika. Maybe the cumin could be turned up a bit, too, since it's so important in Mexican cooking.

The following day was our anniversary. That was fun! In the midst of our busy day (haha), we made blueberry spice muffins. I love blueberries, and I don't get them often because I can't have them in the house--my mother is allergic. So this was a special treat. I was tempted to eat the whole pint of blueberries myself without bothering with the muffins... But geekiness prevailed, and we whipped up a batch of delicious muffins based on the Joy of Cooking method.

2 cups flour
1/3 cup sugar
3/4 tsp salt
3 tsp baking powder
1 tsp cinnamon
1/2 tsp cloves
1/4 tsp allspice
2 eggs, beaten
4 tbsp melted butter
3/4 cup milk
1 cup lightly floured blueberries
  1. Combine all the dry ingredients
  2. Whisk the butter into the eggs, being sure not to accidentally cook the eggs with overhot butter
  3. Mix the mixture into the dry ingredients with the milk. Don't over mix
  4. Mix (the Joy says "fold," but I think that's excessive) in the blueberries
  5. Portion into muffin tins, filling 1/3 to 1/2 of the way
  6. Bake at 425°F for 15-20 minutes
Aaaah, I loved these muffins sooo much! They were great as snacks, dessert, and breakfast! The berries cooked very nicely and were a bit like a jam filling. I may play with the spices a little, but I think this is overall a very good recipe. Matchstick had never had real blueberry muffins, so this was a great treat for him as well. However, he didn't like the the way the muffins rose, and thinks that the added spices kept them from rising properly. Maybe?

That evening we made ourselves a very nice romantic dinner. We had steak with red wine sauce, sautéed zuccini and squash, and garlic bread. I enjoyed it thoroughly, and I enjoyed teaching Matchstick some more basics. Sautéing and deglazing are so common that it's almost impossible to cook without them. He's learning a lot! Fast study, my boy.

Steak with wine sauce is a very easy recipe, and is also very easy to expand upon. It encompasses two basic elements of stovetop cooking, pan frying and deglazing.

Steak
2 cloves garlic, sliced
Coarse sea salt
Freshly cracked or ground pepper
Red wine (we used Yellowtail Cabernet Sauvignon)
A little butter
  1. Prepare the steak by rinsing it and patting it dry
  2. Sprinkle sea salt and pepper over one side of the steak, and press it in with your hands
  3. In a large pan or skillet, heat the butter so that it covers the entire bottom
  4. Add the garlic and sauté it until it begins to caramelise
  5. Put the steak on top of the garlic, seasoned side down. (At this point, I like to think of something my father's priest from Rochester said--"What sells the steak is the sizzle." You want a good, hearty sizzle when you cook beef this way, or it won't sear properly and your sauce will be weak.) Season the exposed side of the steak using the same method as above
  6. Cook until seared on one side, then flip and sear the other side
  7. Cook until 140°F to 145°F at the thickest point
  8. Remove the steak to the cutting board and let it rest (this is important when you cook meat! Always let it rest before you carve it)
  9. Allow any remaining liquid in the pan to simmer down until the pan is nearly dry (at this point you can butter the pan and sauté any ingredients you'd like to add to the sauce--more garlic, mushrooms, etc.)
  10. Pour a little more wine than is necessary to cover the bottom into the pan. You should hear a vigourous sizzling and hissing
  11. As the wine comes up to the simmer, use a spatula to stir the sauce and get all the yummy brown bits up off the bottom of the pan and dissolved into the sauce
  12. Add some butter, and allow the sauce to reduce to concentrate the flavour and thicken it slightly (if you want to thicken it more, I see no reason why you can't use a little roux)
  13. Slice the steak, being mindful of the grain (you want the side of the slice you're going to bite to be as close to perpendicular to the grain as possible...sometimes difficult with lower quality cuts)
  14. Add the released juices to the sauce
  15. Serve hot with warm sauce
This came out pretty well, I think. The steak was a little tough, and I think this is partially because I wasn't careful enough when I cooked it: I'm not used to cooking on a gas range, so I should have been a little more cautious. The flavour, though, was quite good, and the sauce was delicious. I may have needed to let it reduce a little more, but only for thickness. It had good colour and was well balanced. Matchstick had never had a wine sauce over steak before, and said he loved it. "The sauce had a very wine taste to it, which I guess is normal, but it was just something I've never had with steak before. Very good, though."

Sautéing is sort of an all-purpose method of cooking just about anything. It's sort of a more laid-back form of stirfrying.

1 zucchini, in half-moons
1 summer squash, in half-moons
1 clove garlic, sliced
A handful of chopped (mincing is waaay too hard) parsley
Salt to taste
Butter
  1. Melt the butter and throw in the garlic. Sauté until it begins to caramelise, then add the parsley, continuing to sauté
  2. Add the zucchini and squash, and sauté until tender, salting just at the end
  3. Serve warm
This went well, nice and buttery. I wish I had remembered to add the vidalia onion we had in the fridge...some fennel would have been nice, too. Anyway, this sort of recipe is easy, delicious, and infinitely extensible! Matchstick doesn't eat nearly as many vegetables as he ought to, but this is one of his favourite ways to cook summer vegetables. He heavily salted his (oops...I forgot the salt while I was cooking!), and said he loved them, with or without the onion.

Garlic bread...ah, garlic bread. So delicious. So buttery. So flavourful. This exemplifies garlic: it is a powerful flavour, but it is by no means unpleasant or overpowering. Garlic is highly versatile, and everyone should love it.

1 loaf Italian bread or baguette
1/2 cup butter, melted
3 cloves garlic, minced or crushed with a garlic press
A handful chopped parsley
  1. Slice the bread nearly to the bottom crust, but not quite
  2. To the hot butter, add the parsley and garlic. Mix well
  3. Pour and brush onto the exposed insides of the bread (Matchstick didn't quite follow this recipe. Instead, he halved the loaf lengthwise before cutting it into individual slices and brushing the butter mixture onto the top of the slices)
  4. Bake at 350°F for 2o minutes
  5. Serve hot
Aaaah, I loved this so much! It was delicious! And best of all, Matchstick made it all by himself!! I'm proud! I said that this exemplifies garlic. It's true. The flavour was clear and pronounced, but by no means repulsive. It was delicious. It was the sort of garlic dish you could eat and not need a mint afterwards.

With our dinner, we drank some of the wine we used for the steak's sauce, Yellowtail's (yes, an Australian wine. They actually make some excellent wines down under!) Cabernet Sauvignon. It was quite good, I think, accompanying the meal. And, as my high school art teacher, Doc O'Boyle says, "don't use a colour in just one place!" Drinking it in addition to using it in the sauce filled out the meal nicely. The wine itself is not really an exercise in extremes. It is not notably sweet, but neither is it particularly dry. It's not at all oaky, which was good, as Matchstick dislikes that quality, nor is it particularly tannic. It is a little sour, but this balances well with the rest of its attributes. This is a good, and not terribly expensive wine.

I had sooooo much fun on my visit! And the food geekery was awesome. *happy wiggling and squeeing* I can't wait to cook with Matchstick at school--he has a real kitchen!!
Saturday, May 31, 2008

Babas au Rhum

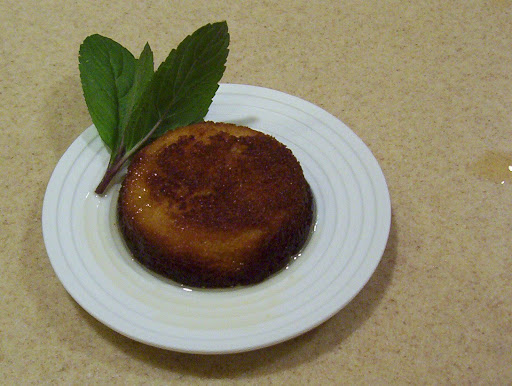
All my plans for choux and frasiers went out the window when I read Tartelette's post on babas au rhum. The combination of citrus, cardamom, and rum captivated my imagination immediately. I'm quite fond of rum, and we just happened to have nearly a full bottle of dark Bacardi, so I took it into my head to make a batch.

Now, I have practically no experience with French pastries. The only "French basic" that I'd attempted before today was génoise cake. That generally turned out well when I made it, but there was always a high chance I'd forget to add the butter at the end. So, trying my hand at another basic recipe, babas au rhum (or pâte á babas to be more specific) was definitely going to be an adventure.
Let me just say that it was nerve-racking. I'm terribly unfamiliar with the methods of the French pâte, and at each step of the way I was constantly fretting, "O! but what if it's too wet? What if it doesn't rise properly?" In the end, it turned out rather well for a first attempt, I think, but there's most definitely room for me to improve. Patience, perhaps, during the rising would be a good place to start. I always say that the two things I don't like about baking are the waiting and the fact that if you screw up there's no fixing it. The waiting was definitely the worst here. The first rising is long enough that you can prepare the compote and the syrup and still have time to spare... Thank goodness for trashy fantasy novels! I'd get all squirrelly otherwise.


Citrus and Cardamom Babas au Rhum

(I'm writing the instructions as I followed them. One of the difficult things here was the measurements by mass rather than volume, and since my kitchen scale is not particularly accurate I decided to double-check based on volume. I've noted the conversions here for the most part, except where it comes out to a fraction you can't measure with standard equipment.)

Babas:
3g (≈ 3/4 tsp) instant dry yeast
20g (≈ 2 Tbsp) warm water
5g (≈ 1 + 1/4 tsp) sugar
100g (≈ 12 Tbsp 2 + 1/2 tsp) flour
2g salt (≈ a dash) salt (unless you're the kind of person who has a measuring spoon for "dash," in which case it's ≈ 5 dashes)
1 large egg (yaye no metric!)
60g (≈ 1/4 cup) milk
40g (≈ 3 Tbsp) melted and cooled butter
50g Citrus Compote (recipe follows)
  • Dissolve the yeast and sugar in water to proof
  • In the bowl of an electric mixer, whisk together the egg and milk
  • Using the paddle attachment, mix the yeast, flour, butter, and salt into the egg mixture
  • Mix until combined and you have a soft dough (This was the first pitfall. When you first mix the ingredients, you get a sort of batter, which begins to come away from the sides of the bowl with mixing. Child (who I really should have consulted before I began) writes that you should have a true dough, rather than a batter. Perhaps I should have beaten the mixture longer? In any case, it became rather more doughy as it was left to rise, and it did rise properly)
  • Let rise until doubled in volume. As Child says, this takes anywhere from 1.5 to 2 hours
Meanwhile, butter the molds you will use (I used large muffin tins), and prepare the compote and syrup.

Compote:
100g (≈ 1/2 cup) sugar
100g (= 100 mL) water
100g mixed citrus (I used most of a navel orange and a little more than half a lemon, plus the zest of both)
6 cardamom pods
  • Combine all the ingredients in a saucepan, and bring to a boil over medium heat
  • Cook 2 minutes
  • Let cool, then remove the cardamom pods
  • Purée the compote until smooth
Syrup:
100g (≈ 100 mL) orange juice
100g (≈ 100 mL ≈ 3.5+ oz) rum (I used dark rum)
70g (≈ 5 Tbsp + 2 tsp) sugar
  • Bring ingredients to a simmer and cook until sugar is dissolved
  • Cool to room temperature
When the first rising is complete,
  • Preheat oven to 400°F
  • Add the compote to the dough and fully incorporate. The mixture will be quite liquid (which was rather worrisome to me. Would it rise properly? I wondered. It did)
  • Fill each mold halfway with the mixture
  • Allow to rise until doubled in volume (I may have jumped a little early here...)
  • Bake for about 15 minutes (I went for a full twenty because when tested with a toothpick they kept looking like they were underdone...but I ended up carbonising their sorry little asses. I may have needed to use a slower oven, maybe around 375, to cook them more evenly)
  • Cool on a wire rack
  • When cooled, set the molds in hot water, and free the babas from their buttery prisons!
  • Place the syrup in a shallow pan or plate
  • Allow the babas to imbibe the syrup, first face down, then right side up, for a total of one minute
  • Refrigerate the babas, covered, until plating time
  • Serve with syrup
I definitely needed to use more cardamom in this recipe. The tartness of the citrus overpowered the spice. While the cake itself was rather tart, once it had imbibed the syrup it had a very pleasant and balanced flavour. It was sweet, tart, and mellow, with a whiff of alcohol. The cake was moist, and its outermost layer was pleasantly soaked with syrup. While these definitely could have suffered to bulk up a bit, either through longer rising or deeper molds, I'd have to say this was a successful first attempt.

Friday, May 23, 2008

Baking Powder Biscuits, Sweet Tea, and Mashed Sweet Potatoes

EDIT: this post was a long time in coming because I kept hoping to be able to take pictures for it...but alas the camera was not cooperating, and the food disappeared like that!

It's almost like I'm trying to be Southern or something! Well, cooks south of the Mason-Dixon Line do have plenty of common sense when it comes to food. Us Yankees could suffer to learn a few things from them. For one thing, they use plenty of fat in their cooking, whether butter or drippings. For another, anyone who invents sweet tea is just genius!

So, since I began making them last year, biscuits have been in constant demand with my family. They really are a joy to make. They can be very hands-on and messy. They're also a joy to eat, and between my huge appetite and my brother's, they go pretty fast. Biscuits are exceptionally versatile; they can be eaten plain, or with just about any topping, made into many kinds of sandwich, and are good at any meal. This recipe for baking powder biscuits comes from James Beard's rather entertainingly titled Beard on Bread. They're very easy to make, bake quickly, and require minimal equipment.

2 cups flour
1/2 stick butter, softened
1/2 tsp salt
1 tsp baking powder
3/4 cup milk
  • Preheat the oven to 425°F (about 218°C)
  • Combine the dry ingredients. Beard says to sift them together
  • Cut in the butter until small particles form. I long ago gave up "cutting in" and just go at it with my hands.
  • Mix in the milk, and knead for one minute.
  • Roll the dough out on a floured surface to 1/8 - 1/4 inch. I generally go for thicker
  • Cut into biscuits! I make square biscuits to avoid overworking the dough making rounds
  • Bake on an ungreased, unfloured baking sheet for 12 to 15 minutes, or until golden on top
  • Remove from the oven and transfer biscuits to a wire cooling rack
  • Serve warm
I generally make a double recipe. You need slightly more than four cups of flour when you double, for whatever reason. Many variations can be made on this recipe. One of my favourites is to make beer biscuits. In a double recipe, just substitute a bottle of porter or stout (or weißbier, even) for the milk. Beard's recipe for buttermilk biscuits is only a slight variation on the baking powder method.
Troubleshooting: when you're beginning, it's easy to overwork the dough. If the biscuits come out a little tough, that's why. If the biscuits are slightly over or under done, only adjust the cooking time by one or two minutes--it's easy to overdo them! If the biscuits are flat or rather un-fluffy, make them thicker, and make sure your baking powder is still good. To do this, add a little to a glass of water. It should fizz, and not at all weakly.

I was first introduced to sweet tea on a robotics club trip to Atlanta, Georgia. Ever since then, I've been in love with it. When I chance to travel in the South (never mind it's usually in places with high populations of Yankees *laugh*), I always have sweet tea with at least one meal. Try as I may, I can never get it to taste quite as good as they do...but I'm trying! Irrespective, this is one of my favourite summer drinks. I love a glass of ice-cold sweet tea after I've been out mowing the lawn!

The basic method for making sweet tea is very simple, if unrefined. I call it the 3-2-1 Method. It's sufficient, but I definitely want to refine this method. Anyway, here are basics:

3 tsp tea (or tea leaves for three)
2 cups water
1 cup sugar or honey, or some combination of the two (occasionally I combine them by thirds or fourths)
1/4 tsp baking soda
  • Put the tea into the water and bring to a boil
  • Remove from the heat and add the baking soda. This will help neutralise the astringent tannins in the tea, as well as darken the colour of the tea
  • Strain and mix with the sweetener
  • Dilute to approximately 1 quart with plain water
  • Chill
Cup for cup this has more sugar than Coca Cola, but who cares? It's yummy! And really, you don't need to use a full cup of sweetener. As it is, the sugar threatens to overwhelm the flavour of the tea. As I work with this, I'd expect I'll tone the sugar back, probably closer to 3/4 cup or 2/3 cup.

Sweet potatoes are, in my opinion, absolutely amazing. Not just because they're sweet and orange, either! They're remarkably versatile, and fit in meals for every season. They also make very good lunches and snacks baked whole. This was my first attempt at making mashed sweet potatoes, and I have to say, I think it went pretty well. My taste buds are still not quite adjusted back to normal from the overly salty, overly greasy food I had at UMass, but the seasoning seemed to work out just fine.

3 sweet potatoes
3 tbsp dark brown sugar
2 tbsp butter
salt and pepper to taste
  • Peel the potatoes and chop into large pieces
  • In a pot, cover the potatoes with cold water, and bring to a boil
  • Simmer until the potatoes are tender. I had the pot covered during cooking, but more out of intuition than anything
  • Drain, and immediately add the butter. Mash to combine
  • Add the sugar, and finish the mashing
  • Salt and pepper to taste
I have to say, as hard as I tried, my brother still does a better job mashing potatoes than I do. I'll have him do the honours next time.

My next adventure, I think, is going to be choux a la creme, more commonly known as cream puffs. (What can I say? I love the French name. Blame Antique Bakery.) Perhaps after I manage those, I'll be bold enough to attempt the Gâteau St. Honoré. On the other hand, Tartelette's chilled lemon and strawberry frasiers look like they'd be a lot of fun~ Who knows? More baking on the list, undoubtedly, and probably stir-fry, since my mother's been dropping hints.