Showing posts with label beef. Show all posts

Wednesday, September 10, 2008

Génoise and mousseline, moving in, and other oddities

Ah, how time flies! Already, I'm in the second week of school!! So, this is my first post of the year! Yaye! I'm glad to be back at UMass, even if I have to eat DC food :p But I've had plenty of opportunity to cook already! And, I've gotten to use the brand-new cookware my mother and nonna bought for me :) Thank you so much!! I <3 you both lots and lots!

Anyway, before the epic moving-in day, we had one last family dinner at home: me, my brother, nonna, mother, and father all at the table for one last time before the insanity of autumn set in. With our antipasti we had some prosecco, which is, as Gab said, "the Italian answer to champagne." As its name suggests, prosecco is a dry sparkling wine, much closer to the character of champagne than asti spumante. It's quite nice (you may be seeing another post about it near Yuletide ;) ). Nonna made some absolutely amazing lasagna...I still have a little morsel in my fridge which is screaming "EAT ME!!" I've been saving it because I don't want to run out, as silly as that sounds. Anyway, for a finish to the delicious meal, I made "little 'layer cakes.'" I sandwiched dark chocolate mousseline (generally referred to simply as "mousse") between two rounds of génoise cake and chilled it. For a first try, it went pretty well. I definitely want to develop this recipe further; I feel as though it could become a very refined and delicious dessert.
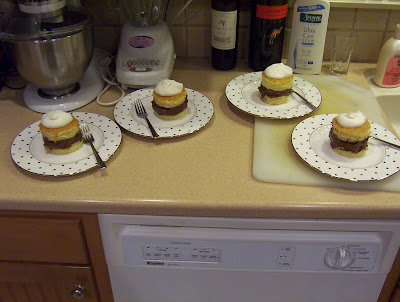
So, there were a few setbacks with this recipe... First, I had no cake rings and the cutters I used for the rings were three inch rings. Second, I discovered at the last moment that we had no lemon (for the cake) or Cointreau (for the mousseline). Third, I absolutely suck at icing. Despite that, I think things turned out well. Here's my recipe...First gen, if you will *laugh*:

Orange Génoise

6 large eggs
3/4 cup sugar
1/2 tsp vanilla
1/2 tsp orange extract (this is where the lemon zest would go usually)
1 cup sifted flour
1 tbsp melted butter
  1. Prep a 9 x 13 pan by buttering its whole interior, then dusting it with flour, tapping out all the excess
  2. Combine the eggs, sugar, vanilla, and orange extract in a bowl (I use the mixer bowl) and whisk over boiling water until just warm, about 1/2 min. Be sure to whisk the whole thing evenly, or you'll end up with little bits of scrambled egg on the sides of the bowl
  3. With the whisk attachment, beat the egg mixture at a high speed for 6-8 min., until pale yellow "and the consistency of a light mayonnaise." Not having ever made mayonnaise, I couldn't say what that is, but you end up with a light yellow foam, which is quite thick. be careful of overworking the eggs at this point (i.e., don't go more than 8 minutes in the mixer) or the cake may not behave properly when it's baking
  4. Add the flour by sprinkling it over the surface of the egg mixture and folding it in, portion by portion
  5. Fold in the melted butter (occasionally I forget this step ^^; if you're silly like me and do that, don't worry, the cake won't be ruined)
  6. Bake at 350°F for 25-30 minutes
  7. When finished, allow to cool completely before removing from the pan and cutting into circles
Chocolate Mouselline

4 eggs, separated
3/4 cup confectioner's sugar (or what Mastering the Art calls "instant sugar," whatever that is)
1/4 cup Drambuie (usually an orange liqueur, such as Cointreau, is used)
6 ounces bittersweet chocolate
1 shot espresso (actually, a café restretto would be even better...)
1 1/2 sticks softened unsalted butter (don't make the mistake of using salted butter--the result is pretty nasty, IMO)
1 tbsp granulated sugar
  1. Beat the egg yolks and sugar together until it is thick, pale yellow, and forms the ribbon
  2. Beat in the Drambuie
  3. Set the bowl over not-quite-simmering water and beat for 3-4 min., until foamy and too hot for your finger
  4. Remove and beat over cold water for another 3-4 min., until it is cool again and forms the ribbon
  5. Melt the chocolate with the coffee over hot water
  6. Remove from the heat and beat in the butter a little at a time
  7. Beat the chocolate mixture into the yolks
  8. Beat the egg whites until they form soft peaks. Sprinkle the sugar over them, then beat until they form stiff peaks
  9. Stir one fourth of the whites into the chocolate and yolk mixture. Fold in the remainder
  10. Chill until firm
Assembly
  1. Spread a thick layer of mousseline on a circle of génoise. Top with a second circle
  2. Chill the cakes in the refrigerator
  3. Make a whipped cream with minimal flavouring
  4. Before serving top each cake with a healthy spoonful of whipped cream
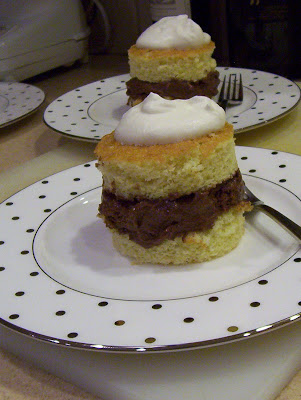
The génoise actually came out quite well. The one immediate issue with it was that I didn't have any lemon zest, so I substituted 1/2 tsp of orange extract. The result was nice, but I definitely should have cut out the vanilla and made it simply an orange-flavoured cake, maybe even using a full teaspoon of extract. Secondarily, I thought that the cake was too dry. That is one of the main characteristics which differentiates génoise from sponge cake. In Antique Bakery (is it sad that I base some of my decisions on a manga?), it's often soaked or brushed with liqueur or syrup, so I think next time I do this I'll make a sort of orange syrup to moisten the cake with, and maybe cut the cake so it's thinner.
The mousseline was a lot of work. I need to build up my arm muscles so I can keep up with all the whisking! It was totally worth it, though. It was very rich and chocolaty, and didn't fall at all. I did, however, think that the chocolate was a little too strong for this use. Perhaps I should use a lighter chocolate next time. Also, as much as I love Ghiradelli, their chocolate has a sour aspect to it which I wasn't thrilled about here. In other recipes, like chocolate chip cookies, it's fine, but here it was a little too pronounced. Perhaps if I have the money I'll see if I can get some E. Guittard, the brand used at the Spoon. Also, the Drambuie could have suffered to be a bit more pronounced. I'll play with the proportions to see if I can get it to speak up a bit.
As for the whipped cream, I've pretty much got the method of whipping down pat. I never end up with cream which is grainy or too close. As far as flavourings go, for this recipe (and probably for many others), you needn't flavour the cream at all; otherwise, it's too heavy and muddles the dessert.
This is a recipe I'm definitely going to develop further.

So, on moving-in day, Matchstick met me to help me move in, and our mothers went off to have a light lunch at the Rt. 9 Diner, where we later met them and had a quick dinner. Then, we all went on a grocery adventure! Matchstick's mother got him a big load of essentials, and my mother got me four Goya ginger beers and a bag of Starbucks French Roast. Thanks so much mom!! Goya's ginger beer is absolutely the best. And I fell in love with the coffee as soon as I made my first cup! It makes an excellent French press.

So, in these first two weeks, we've already had some fun adventures. First, was a beef adventure. Matchstick had forgotten to put the 2+ lbs of ground beef his mother had bought him in the freezer, so it had just been sitting in the fridge...O no!! You really do have to freeze meat right after buying it if you're planning on storing it for a long time. But it wasn't a problem. We cooked it up with a pound of black beans, half a yellow onion, and healthy helpings of parsley, chili powder, paprika, salt, pepper, and crushed cumin seeds (we accidentally got whole seeds instead of ground, so I "minced" them with one of the super-duper awesome knives his flatmate Adrienne brought). We used pretty much the method we used in the taco recipe, but with rather more water to cook the beans thoroughly. I guess it was a bit like chili, the method we used, but with rather fewer ingredients. We froze the whole lot and had some with buttered ziti a few nights later. We topped it with some smoked cheddar that his flatmate Jake gave us (bless his hippie soul), which was quite good. I definitely think our "chili" needed more seasoning...I need to stop being so afraid of overspicing everything!
You know what it needed (apart from less paucity *laugh*)? Blair's. When my mother got me my new cookware, she also got me a bottle of Blair's Original Death Sauce. Let me just say that it's sooooo gooooood!! I remember eating Blair's Death Rain Chips in middle school... O, I did love them so. This sauce is "all this and more!" I made myself a batch of scrambled eggs loaded up with Blair's--so good!! I might actually make some tonight for a snack.

Last night, I was over at Matchstick's and we were at a loss for what to make, so I pulled out a bag of lentils and we made lentil soup. I love lentils. They're one of my favourite beans, and they make the most excellent soups, stews, and porridges. Lentil soup is exceptionally easy to make, very hearty, very filling, and very healthy.

1 pound lentils
4 cups water (or chicken stock)
2 chicken bullion cubes (omit these if using stock)
1 clove garlic, a little coarser than minced
1/2 yellow onion, chopped between coarse and fine
4 potatoes, in smaller cubes
3 carrots, in rounds or half-moons
Butter, butter, and more butter
Salt and pepper to taste
  1. In your soup pot, melt a bit more butter than you would generally need
  2. Sauté the garlic, then add the onions
  3. When the onions begin to caramelise, add the carrots
  4. When the carrots begin to become tender, add the potatoes
  5. When the potatoes have begun to soften on the outside, add some water to the pot to deglaze it
  6. Add the lentils, water, and bullion. Bring to a boil
  7. Boil 5 minutes, covered, stirring occasionally
  8. Simmer, covered, adding water as needed, until the the potatoes are completely cooked
  9. Season with salt and pepper
  10. Simmer, covered, until the soup is very thick
This was delicious, but we were a little too light on the salt. It was good over pasta, but I think it would go better with rice. I'm looking forward to making this in the winter; I think it'll be an excellent cold-weather food.

Thursday, August 14, 2008

Yaye boi! Culinary Adventures on my Three Month Anniversary

Ah, I've been a very bad blogger. Maybe I need to be spanked... So, I totally didn't write about the week-long adventure of Matchstick in NJ...But I'll try my best to write about some of our adventures in the near future...sometime before I go back to UMass. Anyway:
I went up to RI for two and a bit days to see Matchstick for our 3 month anniversary. So exciting!! This is a first for both of us, having an actual long-term relationship. So that was awesome. On top of that, we got to do some awesome cooking! Yaye!

The first thing we did when I arrived was go to the grocery store and buy things for cooking. Haha aah, we're such food geeks! What did we get? How did we use it? That comes soon! But first, let's talk about absinthe. Absinthe, La Fée Verte, is a liquor made from great wormwood, fennel, hyssop, and several other herbs. It is rather high proof (45%-75% alcohol by volume), and is unique in its drinking ritual--it is diluted in an equal volume of water before being consumed. Three varieties of absinthe exist. Blanche, also known as La Bleu, is clear, having been distilled and then bottled. Verte, the famously green absinthe, owes its colour to a second infusion of herbs. Absenta, a Spanish variant of absinthe, has a slightly different and sweeter flavour, owing to a difference in the herbs used. "Hausgemacht" is a term which refers to home-made, or "microbrewed" absinthe. "Czech absinthe," "Bohemian absinthe," and "absinth" all refer to the same thing--and that thing is emphatically not absinthe. It is, to put it politely, wormwood bitters. What I prefer to call it, well...let's not go there haha.
Anyway, I got the chance to taste a Swiss blanche absinthe. While the full absinthe ritual wasn't performed (sugar is placed in a slotted spoon over the glass of absinthe, and water is poured over the sugar, sweetening and diluting the absinthe--don't burn the sugar!!), it was still a very cool experience. It was fun to watch the louche develop when the water was added. The flavour of absinthe is largely liquorice, but it's slightly bitter, owing to the wormwood. Actually, I suppose it would best be described as having a flavour of liquorice with a slightly disturbing note. Still, very good.

The following afternoon, we made a deliciously evil confection, called brickle. It's deliciously evil because it is essentially crispy crackers embedded in butterscotch and chocolate! And it's so very simple to make!

1 cup butter
1 cup brown sugar
saltines to line a baking sheet (about 40, the written form of the recipe says)
1 "large bag" chocolate chips (actually, however much you need to completely cover the pan of brickle)
  1. Line a baking pan with foil, remembering to crimp the edges. Line the bottom of the prepared pan with saltines
  2. Heat the butter and brown sugar on the stove. When the butter has melted, whisk vigorously to combine
  3. Allow the butter and sugar mixture (butterscotch!!) to simmer for three minutes
  4. Pour the butterscotch over the saltines and spread it evenly
  5. Bake at 400°F for 5 minutes
  6. Pour chocolate chips over brickle, and as they melt spread them evenly over the surface
  7. Refrigerate for 2 hours, then break into pieces. Generally, the brickle will cleave most cleanly along the edges of the crackers
This is a delicious and simple sweet. Anyone with two neurons to rub together can make it. Despite this, there's also room for more advanced techniques to be used. I'd like to play around with the butterscotch a bit, and I'd like to see if I can temper the chocolate so the brickle won't melt so quickly in my hand.

That evening we made tacos for his family, and dinner was quite a nice affair. I've never made taco filling from scratch before, so this was a neat experiment that turned out well! This recipe is a bit (i.e., very) vague, but a lot of this is based on personal tastes.
  • Brown 1.5 lb ground beef in a pan
  • Drain the beef, and set it aside. In the same pan, heat some oil and sauté a clove (or two) of garlic and some (I used one, but at least two are needed) fresh sliced jalapeños. Add a teaspoon or two of coriander and sauté until the garlic begins to caramelise
  • Add the beef, then season with cumin, paprika, cilantro, dried chili pepper, salt, black pepper. Continue to sauté
  • After the beef has become fragrant, add some water to the pan as if you were deglazing the pan. Allow the beef to absorb the water. Repeat this process as you cook the beef and adjust the spices (I actually borrowed this method from the recipe for aloo gobi, in which you add larger amounts of water as you cook the vegetables to make the sauce)
  • Add some finely chopped onion and cook until it is tender, continuing with the water treatment
  • When the seasoning is satisfactory, remove the filling from the heat and portion it into hard taco shells (16 at most)
  • Top with slices of cheese (we used American, but cheddar or pepperjack would do wonderfully)
  • Heat in a 325°F oven until the cheese is melted
  • Serve hot with chopped tomatoes, shredded lettuce, sour cream, salsa, etc.
I think the tacos turned out pretty well, and I was proud that I didn't use any spice mixes. I do need to stop being afraid of overspicing things, though. I definitely needed to "kick it up a notch!" More pepper and onion, and more paprika. Maybe the cumin could be turned up a bit, too, since it's so important in Mexican cooking.

The following day was our anniversary. That was fun! In the midst of our busy day (haha), we made blueberry spice muffins. I love blueberries, and I don't get them often because I can't have them in the house--my mother is allergic. So this was a special treat. I was tempted to eat the whole pint of blueberries myself without bothering with the muffins... But geekiness prevailed, and we whipped up a batch of delicious muffins based on the Joy of Cooking method.

2 cups flour
1/3 cup sugar
3/4 tsp salt
3 tsp baking powder
1 tsp cinnamon
1/2 tsp cloves
1/4 tsp allspice
2 eggs, beaten
4 tbsp melted butter
3/4 cup milk
1 cup lightly floured blueberries
  1. Combine all the dry ingredients
  2. Whisk the butter into the eggs, being sure not to accidentally cook the eggs with overhot butter
  3. Mix the mixture into the dry ingredients with the milk. Don't over mix
  4. Mix (the Joy says "fold," but I think that's excessive) in the blueberries
  5. Portion into muffin tins, filling 1/3 to 1/2 of the way
  6. Bake at 425°F for 15-20 minutes
Aaaah, I loved these muffins sooo much! They were great as snacks, dessert, and breakfast! The berries cooked very nicely and were a bit like a jam filling. I may play with the spices a little, but I think this is overall a very good recipe. Matchstick had never had real blueberry muffins, so this was a great treat for him as well. However, he didn't like the the way the muffins rose, and thinks that the added spices kept them from rising properly. Maybe?

That evening we made ourselves a very nice romantic dinner. We had steak with red wine sauce, sautéed zuccini and squash, and garlic bread. I enjoyed it thoroughly, and I enjoyed teaching Matchstick some more basics. Sautéing and deglazing are so common that it's almost impossible to cook without them. He's learning a lot! Fast study, my boy.

Steak with wine sauce is a very easy recipe, and is also very easy to expand upon. It encompasses two basic elements of stovetop cooking, pan frying and deglazing.

Steak
2 cloves garlic, sliced
Coarse sea salt
Freshly cracked or ground pepper
Red wine (we used Yellowtail Cabernet Sauvignon)
A little butter
  1. Prepare the steak by rinsing it and patting it dry
  2. Sprinkle sea salt and pepper over one side of the steak, and press it in with your hands
  3. In a large pan or skillet, heat the butter so that it covers the entire bottom
  4. Add the garlic and sauté it until it begins to caramelise
  5. Put the steak on top of the garlic, seasoned side down. (At this point, I like to think of something my father's priest from Rochester said--"What sells the steak is the sizzle." You want a good, hearty sizzle when you cook beef this way, or it won't sear properly and your sauce will be weak.) Season the exposed side of the steak using the same method as above
  6. Cook until seared on one side, then flip and sear the other side
  7. Cook until 140°F to 145°F at the thickest point
  8. Remove the steak to the cutting board and let it rest (this is important when you cook meat! Always let it rest before you carve it)
  9. Allow any remaining liquid in the pan to simmer down until the pan is nearly dry (at this point you can butter the pan and sauté any ingredients you'd like to add to the sauce--more garlic, mushrooms, etc.)
  10. Pour a little more wine than is necessary to cover the bottom into the pan. You should hear a vigourous sizzling and hissing
  11. As the wine comes up to the simmer, use a spatula to stir the sauce and get all the yummy brown bits up off the bottom of the pan and dissolved into the sauce
  12. Add some butter, and allow the sauce to reduce to concentrate the flavour and thicken it slightly (if you want to thicken it more, I see no reason why you can't use a little roux)
  13. Slice the steak, being mindful of the grain (you want the side of the slice you're going to bite to be as close to perpendicular to the grain as possible...sometimes difficult with lower quality cuts)
  14. Add the released juices to the sauce
  15. Serve hot with warm sauce
This came out pretty well, I think. The steak was a little tough, and I think this is partially because I wasn't careful enough when I cooked it: I'm not used to cooking on a gas range, so I should have been a little more cautious. The flavour, though, was quite good, and the sauce was delicious. I may have needed to let it reduce a little more, but only for thickness. It had good colour and was well balanced. Matchstick had never had a wine sauce over steak before, and said he loved it. "The sauce had a very wine taste to it, which I guess is normal, but it was just something I've never had with steak before. Very good, though."

Sautéing is sort of an all-purpose method of cooking just about anything. It's sort of a more laid-back form of stirfrying.

1 zucchini, in half-moons
1 summer squash, in half-moons
1 clove garlic, sliced
A handful of chopped (mincing is waaay too hard) parsley
Salt to taste
Butter
  1. Melt the butter and throw in the garlic. Sauté until it begins to caramelise, then add the parsley, continuing to sauté
  2. Add the zucchini and squash, and sauté until tender, salting just at the end
  3. Serve warm
This went well, nice and buttery. I wish I had remembered to add the vidalia onion we had in the fridge...some fennel would have been nice, too. Anyway, this sort of recipe is easy, delicious, and infinitely extensible! Matchstick doesn't eat nearly as many vegetables as he ought to, but this is one of his favourite ways to cook summer vegetables. He heavily salted his (oops...I forgot the salt while I was cooking!), and said he loved them, with or without the onion.

Garlic bread...ah, garlic bread. So delicious. So buttery. So flavourful. This exemplifies garlic: it is a powerful flavour, but it is by no means unpleasant or overpowering. Garlic is highly versatile, and everyone should love it.

1 loaf Italian bread or baguette
1/2 cup butter, melted
3 cloves garlic, minced or crushed with a garlic press
A handful chopped parsley
  1. Slice the bread nearly to the bottom crust, but not quite
  2. To the hot butter, add the parsley and garlic. Mix well
  3. Pour and brush onto the exposed insides of the bread (Matchstick didn't quite follow this recipe. Instead, he halved the loaf lengthwise before cutting it into individual slices and brushing the butter mixture onto the top of the slices)
  4. Bake at 350°F for 2o minutes
  5. Serve hot
Aaaah, I loved this so much! It was delicious! And best of all, Matchstick made it all by himself!! I'm proud! I said that this exemplifies garlic. It's true. The flavour was clear and pronounced, but by no means repulsive. It was delicious. It was the sort of garlic dish you could eat and not need a mint afterwards.

With our dinner, we drank some of the wine we used for the steak's sauce, Yellowtail's (yes, an Australian wine. They actually make some excellent wines down under!) Cabernet Sauvignon. It was quite good, I think, accompanying the meal. And, as my high school art teacher, Doc O'Boyle says, "don't use a colour in just one place!" Drinking it in addition to using it in the sauce filled out the meal nicely. The wine itself is not really an exercise in extremes. It is not notably sweet, but neither is it particularly dry. It's not at all oaky, which was good, as Matchstick dislikes that quality, nor is it particularly tannic. It is a little sour, but this balances well with the rest of its attributes. This is a good, and not terribly expensive wine.

I had sooooo much fun on my visit! And the food geekery was awesome. *happy wiggling and squeeing* I can't wait to cook with Matchstick at school--he has a real kitchen!!